Building your own CAPTCHA system
Visual and computational leading zero challenge
Introduction
About a year ago in my work, I had the chance to spend a great time on something called “FedEx day”. It’s an event like a hackathon when you try to deliver software solution just in one day like FedEx (great marketing btw ;p)
I worked with one of my teammates with strong knowledge of various topics (Przemo it’s about you) so we decided to work on something unusual. My team manages authentication in multiple services in a few EU countries (Switzerland, Germany, Poland, Belgium), we have about 100 million authentication requests per month and we are still working on improving the security of our systems. So we decided to prepare a simple CAPTCHA mechanism based on canvas and proof-of-work mechanism with leading zeros like in hashcash.

Our mechanism, even if not perfect, works. So it was ready to polish, refactor and work further after the event. From this day I saw a few other implementations of CAPTCHA similar to what we did. And in this comprehensive tutorial, I decided to show how you can create your own CAPTCHA with TypeScript and JavaScript, Node and React stack. You don’t need to be an expert in any of these technologies because I’ll explain everything for beginners.
CAPTCHA or HIP?
CAPTCHA is another, more popular name of software genre called HIP, which stands for Human Interaction Proof. This software is based on the reverse-Turing test, where the computer tries to distinguish a real user from an artificial one.
HIPs are a very popular topic because, with the growing potential of the Internet, more bots are trying to break into systems. They are using different mechanisms, from brute force attacks to various types of dictionary attacks to crack passwords. We can limit the number of requests per second, set up firewalls to allow connections from only specific IP zones and do a lot of other things to secure login forms and applications. We can also use HIP to ensure that on the opposite side of the monitor is a human.
Different Types of HIPs
HIPs have different forms. Among them are some based on pareidolia, the effect of poor perception and associating things by similar shapes and details. This type of HIP usually generates an image with text on the server-side, stores the text value temporarily and compares the response from the front. However, on the market are tools like Captcha Sniper which solve most of those CAPTCHA tests with high accuracy.

Other HIP software is based on audio where on the server-side a short audio track with text to speech is generated, then slightly distorted and returned to the user. However, there are speech recognition services. Even Google has its own GCC Speech Recognition service.
In our case, we are going to make a CAPTCHA which will require interaction with some Web APIs like Canvas and Web Crypto. The user will drag a jigsaw to the right place, then solve a little leading zero challenge. To prevent bots like this we are going to check the response on the server-side only when both factors are sent.
Software Architecture
Our project will be written in TypeScript with Node.js as a webserver, React and Pixi.js on the frontend side. Of course, there will be a lot more libraries, but for now, that’s enough. On the server-side, for each request-id, we will store a position where the puzzle is placed on the image and an array with challenges for leading zero proof of work.
On the frontend side, we are going to use React for rendering the CAPTCHA widget and displaying an image from the backend side. React will render the canvas object from Web API and handle user input. In this case, it will be just moving the puzzle in four directions on the canvas. When a user submits their response, the widget application will have calculated prefixes for the leading zero challenge by the time it sends to the server.
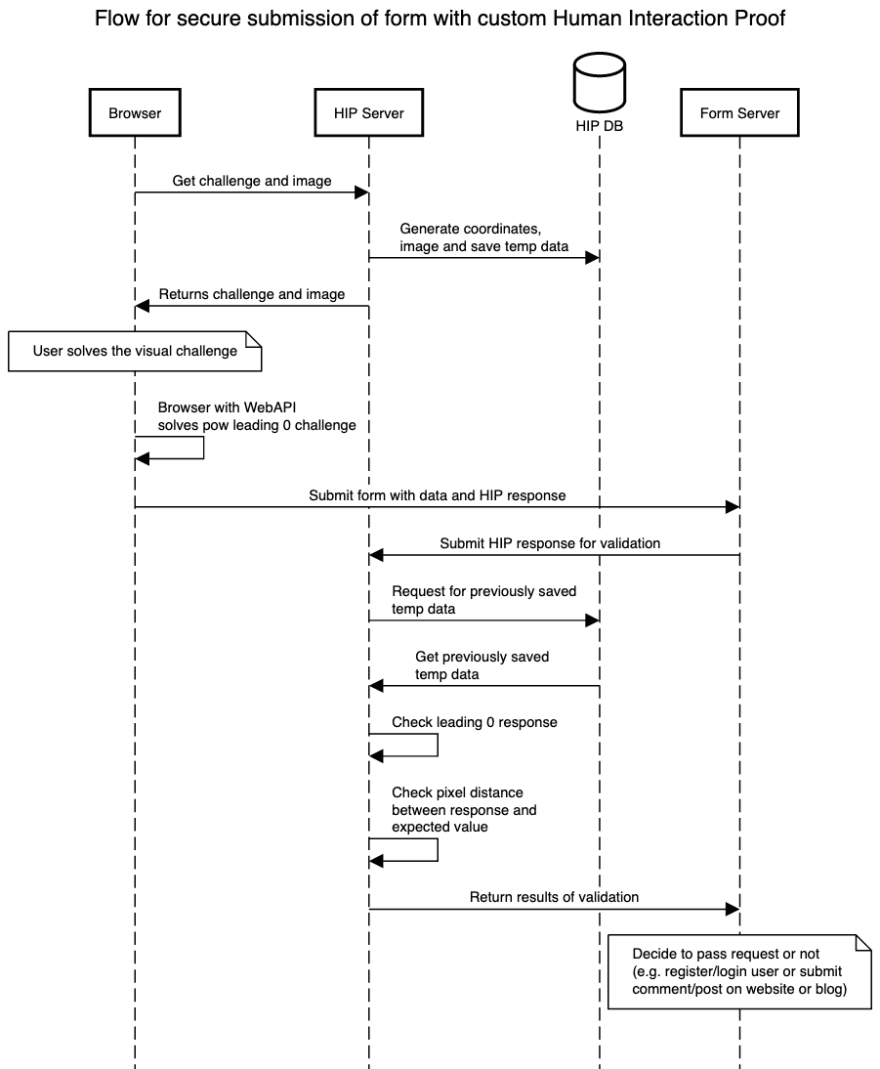
Below is a sample, universal flow chart for submitting the form (registration, login, comment or any other form) with our new HIP mechanism.
Part 1: Setting up the Development Environment
Installation
Let’s initialise the project with installing libraries. Install React, React-DOM, styled-components, webpack and TypeScript. Then install types, ESLint and utils plugins.
To install libraries faster, just copy them from package.json below that I prepared. Then run yarn and yarn upgrade --latest to upgrade to the newest version.
{
  "name": "devcaptcha",
  "version": "1.0.0",
  "main": "dist/devcaptcha.dist.js",
  "devDependencies": {
    "@types/react": "^16.9.35",
    "@types/react-dom": "^16.9.8",
    "@types/styled-components": "^5.1.0",
    "@typescript-eslint/eslint-plugin": "^2.33.0",
    "@typescript-eslint/parser": "^2.33.0",
    "eslint": "^7.0.0",
    "eslint-plugin-react": "^7.20.0",
    "source-map-loader": "^0.2.4",
    "ts-loader": "^7.0.4",
    "typescript": "^3.9.2",
    "webpack": "^4.43.0",
    "webpack-cli": "^3.3.11",
    "webpack-dev-server": "^3.11.0"
  },
  "dependencies": {
    "react": "^16.13.1",
    "react-dom": "^16.13.1",
    "styled-components": "^5.1.0"
  },
  "scripts": {
    "start": "webpack-dev-server --open --config webpack.development.config.js",
    "build": "webpack --config webpack.production.config.js",
    "eslint": "./node_modules/.bin/eslint .",
    "fix": "./node_modules/.bin/eslint --fix ."
  }
}
Dev Server for Hot Reload
After installation, create directory public and index.html file and put inside:
<!DOCTYPE html>
<html>
<head>
    <meta charset="UTF-8" />
    <title>Hello React!</title>
</head>
<body>
<div id="captcha"></div>

<script crossorigin src="https://unpkg.com/react@16/umd/react.development.js"></script>
<script crossorigin src="https://unpkg.com/react-dom@16/umd/react-dom.development.js"></script>
<script src="main.js"></script>
</body>
</html>
This file will be served on the dev server. Before closing the body tag it contains links to React on CDN, just for the development process. We want to have an independent file similar to Web Components (if you want, you can wrap this project and create a custom element) to work in different situations.
Webpack
Create webpack.development.config.js file for development like below. Configure port and public directory. This file also contains information about bindings in source maps between original and minified files. Make sure to install ts-loader to be able to resolve and load TypeScript files.
module.exports = {
  mode: "development",
  devtool: "source-map",
  devServer: {
    contentBase: './public',
    compress: false,
    port: 8080,
  },
  resolve: {
    extensions: [".ts", ".tsx", '.js', '.json']
  },
  module: {
    rules: [{
      test: /\.ts(x?)$/,
      exclude: /node_modules/,
      use: [{
        loader: "ts-loader"
      }]
    }, {
      enforce: "pre",
      test: /\.js$/,
      loader: "source-map-loader"
    }]
  },
  externals: {
    react: "React",
    "react-dom": "ReactDOM",
  }
};
Similarly, create production config for builds webpack.production.config.js. It’s very close to the previous, however it doesn’t contain dev server configuration, different mode and externals. Externals are used to skip and create globals. In the dev mode, we are using CDN links to make hot reload faster. In the production mode we want to bundle everything together.
module.exports = {
  mode: "production",
  devtool: "source-map",
  output: {
    filename: 'devcaptcha.dist.js'
  },
  resolve: {
    extensions: [".ts", ".tsx", '.js', '.json']
  },
  module: {
    rules: [{
      test: /\.ts(x?)$/,
      exclude: /node_modules/,
      use: [{
        loader: "ts-loader"
      }]
    }, {
      enforce: "pre",
      test: /\.js$/,
      loader: "source-map-loader"
    }]
  },
};
TypeScript
Create configuration for TypeScript tsconfig.json. Parameter noImplicitAny set to true disallows compilation when somewhere a variable is untyped. Parameter jsx specifies that we are using tsx files. Library array contains different types loaded by default. Entry dom allows accessing Web API and objects like window.document.
{
  "compilerOptions": {
    "outDir": "./dist/",
    "sourceMap": true,
    "noImplicitAny": true,
    "module": "CommonJS",
    "jsx": "react",
    "target": "es5",
    "lib": [
      "es6",
      "dom"
    ]
  }
}
Initial Source Code
Ok, almost ready. You need to create an entry point for TypeScript. With React we will be using .tsx extension. It’s like TypeScript with some additional sugar.
Create directory src and index.tsx inside. Inside import the entire React and ReactDOM and create a class with a method for rendering/mounting CAPTCHA in the right place.
In my case, I am looking for root element by selector passed in the constructor. The class that I created implements interface ICaptcha with common properties for hypothetical, different CAPTCHAs and DevCaptcha too.
Important is to assign the reference to DevCaptcha on window object to make access possible. However, in TypeScript, you cannot assign directly to a global object. Firstly declare an extended interface to the object.
import * as React from "react";
import * as ReactDOM from "react-dom";

import { App } from "./components/App";

interface ICaptcha {
  _appendSelector: string
}

type CaptchaConfig = {
  appendSelector: string
}

class DevCaptcha implements ICaptcha {
  readonly _appendSelector : string;

  public constructor(config : CaptchaConfig) {
    this._appendSelector = config.appendSelector;
  }

  mount() {
    ReactDOM.render(<App />, document.querySelector(this._appendSelector));
  }
}

declare global {
  interface Window { DevCaptcha: object; }
}

window.DevCaptcha = window.DevCaptcha || {};
window['DevCaptcha'] = DevCaptcha;
ESLint
Finally, configure ESLint to quickly look for code quality problems. You can configure it for yourself. If you have your own ESLint config, just use it.
Create .eslintrc with the following code:
module.exports = {
  "env": {
    "browser": true,
    "commonjs": true,
    "es6": true
  },
  "extends": [
    "eslint:recommended",
    "plugin:react/recommended",
    "plugin:@typescript-eslint/eslint-recommended"
  ],
  "globals": {
    "Atomics": "readonly",
    "SharedArrayBuffer": "readonly"
  },
  "parser": "@typescript-eslint/parser",
  "parserOptions": {
    "sourceType": "module",
    "ecmaFeatures": {
      "jsx": true,
    },
    "ecmaVersion": 2018
  },
  "plugins": [
    "react",
    "@typescript-eslint"
  ],
  "rules": {
    "indent": ["error", 2]
  }
};
and .eslintignore with directories to exclude
node_modules
public
dist
You Did It!
If you did everything well, you should be able to run the dev server of this app.
yarn start
Open browser on localhost at the port which you set up previously. In my case, it’s 8080, so open http://localhost:8080. You should see Hello World setup for React, widget-based application.
This prepares the environment for future work on the client-side of the CAPTCHA.
If you want to skip reading, just download source code from the repository. Leave a star if you like the project. ⭐
Part 2: Building the Canvas Interface with PIXI.js
PIXI.js
To control canvas we are going to use PIXI.js, so move to the project directory and install by running:
yarn add pixi.js
Then import in the main component of the canvas.
import * as PIXI from 'pixi.js';
To use the PIXI library, we need to create a PIXI Application and append its view somewhere on the website. Because we are working on a widget-like tool, the application view is going to be attached inside the component. The application we will create on the first mounting with the componentDidMount method or even in the constructor. In my case, the second option is cleaner, because I won’t be switching between different components.
export class App extends React.Component<any, IApp> {
  constructor(props : any) {
    super(props);

    this.state = {
      app: new PIXI.Application({
        width: 480,
        height: 280,
        backgroundColor: 0xeeeeee,
        resolution: window.devicePixelRatio || 1,
      }),
    };
  }
// ...
}
On the first line, you see that I’m telling the interface IApp to define how the state of the component is going to look like. Now, just PIXI application under “app” key is fine.
interface IApp {
  app: PIXI.Application
}
In the initial state, I created a new PIXI Application instance with the width and height of the canvas and a very bright background colour.
View for our application we can append in the previously mentioned componentDidMount like below:
componentDidMount() {
    document.getElementById('devcaptcha-container').appendChild(this.state.app.view);
}
And inside render method we need to create HTML element with devcaptcha-container id:
  render() {
    return <div id={"devcaptcha-container"}/>;
  }
If you did everything well, you should be able to render a rectangle somewhere in your application.
Canvas Elements
Now, we need to add canvas elements for CAPTCHA. My CAPTCHA will contain:
- instruction on how to use CAPTCHA,
- white stripes on the top and the bottom as the background for text and button,
- button for submitting a CAPTCHA response,
- image background with a picture from the backend with a drawn puzzle,
- puzzle element to drag and drop to match with the one from backend,
PIXI has various classes for representing canvas elements. For the background, we can use Sprite and alternative construction method, which accepts an image URL as argument.
const background = PIXI.Sprite.from('https://placeholderimg.jpg');
And then set some properties. In this case, we want to stretch the background on the entire canvas. Initial anchor point (position point) of the elements in PIXI is in the top-left corner. So our background sprite should start at position 0,0 (top-left edge of the canvas) and be 100% width and height. We can use the previously saved reference to the object of PIXI application, and view.
background.width = this.state.app.view.width;
background.height = this.state.app.view.height;
And finally, we can append this background object inside the view:
this.state.app.stage.addChild(background);
Awesome! At this point, you should see your image in the background. Now let us add white, background stripes. We are going to use the Graphics class for this, which is responsible for primitive, vector shapes. With this class, we can add two 32px stripes for top and bottom and two 4px thin shadow lines.
    // top stripe
    const stripes = new PIXI.Graphics();
    stripes.beginFill(0xffffff);
    stripes.drawRect(0, 0,
      this.state.app.view.width,
      32
    );
    stripes.endFill();

    // bottom stripe
    stripes.beginFill(0xffffff);
    stripes.drawRect(0,
      this.state.app.view.height - 32,
      this.state.app.view.width,
      32
    );

    // top shadow
    stripes.beginFill(0xdddddd, 0.5);
    stripes.drawRect(0, 32,
      this.state.app.view.width,
      4
    );
    stripes.endFill();

    // bottom shadow
    stripes.beginFill(0xdddddd, 0.5);
    stripes.drawRect(0,
      this.state.app.view.height - 36,
      this.state.app.view.width,
      4
    );
    stripes.endFill();
    this.state.app.stage.addChild(stripes);
We also need a button for submitting the CAPTCHA response. We will use the same class as previously. But this time, we will set properties for interactive and event listener.
    // submit button
    const submitButton = new PIXI.Graphics();
    submitButton.interactive = true;
    submitButton.buttonMode = true;
    submitButton.on('pointerdown', () => {
      // on mouse fire
    });
    submitButton.beginFill(0x222222);
    submitButton.drawRect(this.state.app.view.width - 112,
      this.state.app.view.height - 64,
      96,
      48
    );
    submitButton.endFill();
    this.state.app.stage.addChild(submitButton);
Text on the top will inform how to solve CAPTCHA:
    // instruction
    const basicText = new PIXI.Text('Move the jigsaw to the correct position to solve captcha.', {
      fontFamily: 'Arial',
      fontSize: 16,
      fill: '#000000',
    });
    basicText.x = 8;
    basicText.y = 8;
    this.state.app.stage.addChild(basicText);
And the second on the button:
    // text on the submit button
    const submitButtonText = new PIXI.Text('Submit', {
      fontFamily: 'Arial',
      fontSize: 14,
      fill: '#ffffff',
    });
    submitButtonText.x = this.state.app.view.width - 112 + 40;
    submitButtonText.y = this.state.app.view.height - 64 + 16;
    this.state.app.stage.addChild(submitButtonText);
To make this button look better, I added an icon:
    // icon on the submit button
    const submitButtonIcon = PIXI.Sprite.from('https://i.imgur.com/mgWUPWc.png');
    submitButtonIcon.width = 24;
    submitButtonIcon.height = 24;
    submitButtonIcon.x = this.state.app.view.width - 112 + 12;
    submitButtonIcon.y = this.state.app.view.height - 64 + 12;
    this.state.app.stage.addChild(submitButtonIcon);
And finally, two more labels for Terms of Service and Privacy Policy:
    // privacy policy
    const textPrivacy = new PIXI.Text('Privacy', {
      fontFamily: 'Arial',
      fontSize: 12,
      fill: '#777777',
    });
    textPrivacy.interactive = true;
    textPrivacy.buttonMode = true;
    textPrivacy.on('pointerdown', () => {
      // pp
    });
    textPrivacy.anchor.set(0.5, 0.5);
    textPrivacy.x = 24;
    textPrivacy.y = this.state.app.view.height - 16;
    this.state.app.stage.addChild(textPrivacy);

    // terms of service
    const textTerms = new PIXI.Text('Terms', {
      fontFamily: 'Arial',
      fontSize: 12,
      fill: '#777777',
    });
    textTerms.interactive = true;
    textTerms.buttonMode = true;
    textTerms.on('pointerdown', () => {
      // tos
    });
    textTerms.anchor.set(0.5, 0.5);
    textTerms.x = 72;
    textTerms.y = this.state.app.view.height - 16;
    this.state.app.stage.addChild(textTerms);
Puzzle
Now we need to add a puzzle with drag and drop. The puzzle will be a Sprite instance with interactive and buttonMode set to true. Also we need to bind event listeners to proper methods. And because we want to use our CAPTCHA on both mobile and PC we must ensure all input methods are supported.
    // puzzle
    const puzzle = PIXI.Sprite.from('https://i.imgur.com/sNPmMi2.png');
    puzzle.anchor.set(0.5, 0.5);
    puzzle.alpha = 0.5;
    puzzle.interactive = true;
    puzzle.buttonMode = true;
    puzzle.x = 64;
    puzzle.y = this.state.app.view.height / 2;
    puzzle.on('mousedown', this.onDragStart)
      .on('touchstart', this.onDragStart)
      .on('mouseup', this.onDragEnd)
      .on('mouseupoutside', this.onDragEnd)
      .on('touchend', this.onDragEnd)
      .on('touchendoutside', this.onDragEnd)
      .on('mousemove', this.onDragMove)
      .on('touchmove', this.onDragMove);
    this.setState(() => {
      return {
        puzzle
      }
    });
    this.state.app.stage.addChild(puzzle);
Methods onDragStart, onDragEnd, onDragMove are required in the component class. On drag start, we are setting dragging flag in the component state to true, and on drag end to false. When moving cursor or finger above the canvas, onDragMove method will be fired, so we need to make sure we are dragging when holding the puzzle piece. Event for onDragMove contains distance from the previous call. And it may be positive or negative.
  onDragStart() {
    this.setState(() => {
      return {
        dragging: true,
      };
    });
  }

  onDragEnd() {
    this.setState(() => {
      return {
        dragging: false,
      };
    });
  }

  onDragMove(event : any) {
    if (this.state.dragging) {
      const puzzle = this.state.puzzle;
      puzzle.position.x += event.data.originalEvent.movementX;
      puzzle.position.y += event.data.originalEvent.movementY;
    }
  }
With this puzzle, we need to add to our state two more properties and bind three new methods to class:
interface IApp {
  app: PIXI.Application,
  dragging: boolean,
  puzzle: PIXI.Sprite,
}

export class App extends React.Component<any, IApp> {
  constructor(props : any) {
    super(props);

    this.state = {
      app: new PIXI.Application({
        width: 480,
        height: 280,
        backgroundColor: 0xeeeeee,
        resolution: window.devicePixelRatio || 1,
      }),
      dragging: false,
      puzzle: null
    };

    this.onDragEnd = this.onDragEnd.bind(this);
    this.onDragStart = this.onDragStart.bind(this);
    this.onDragMove = this.onDragMove.bind(this);
  }
// ...
}
You should be able to drag the puzzle over the canvas and click on the submit button and small text on the bottom of the canvas.

Part 3: Server-Side Implementation with Node.js
Why Server-Side?
Because our CAPTCHA must be secure, we cannot fetch images for background directly from their file paths. Why? Because all the photos would be the same every time. Moreover, after downloading, they would have the same file signature and file hash. It would be much faster to build a bypass mechanism for solving our CAPTCHA if CAPTCHA relies on repeated data.
Furthermore, sending destination coordinates (a place where the user should move puzzle) may result with network interceptors which scan, capture and then send as the answer the same value as captured.
Instead, we are going to make for every user a little different background with puzzle already on it. User in our case is a device with a different IP address. In other words, when someone loads CAPTCHA, it will fetch a unique background for himself, so file signature will not match with those from previous users.
To achieve this, we will use an image manipulation library. Node has a few different libraries for this. JIMP and SHARP are the two most popular. Both have very rich API for image manipulation but the devil is in the details. JIMP works directly on buffers and matrix of typed JS arrays. SHARP from the other hand, uses low-level LIBAV multimedia library and from the benchmark that I previously took is 5x faster.
Benchmark & Optimization
Composition of two 2k resolution images with JIMP took 4-5s when SHARP can do the same with 500ms. However, 500ms latency for each request is still not acceptable. Both libraries perform better if our background images are smaller, like the size of the canvas. Composition of two images 480x240 with JIMP took about 20ms and with SHARP about 10ms.
To make sure images are optimized, we can pre-process them on startup. To do this, we can check the resolution of each image in a specific directory and save output with a little lower quality.
const fs = require('fs');
const path = require('path');
const sharp = require('sharp');
import {OptimizeConfig} from "../models/OptimizeConfig";

export enum ImageFormat {
  'JPEG',
  'PNG'
}

export default class Optimize {
  static async dir(config: OptimizeConfig) : Promise<Array<string>> {
    const inputFileList = fs.readdirSync(config.inputDirectory);
    const outputFileList = fs.readdirSync(config.outputDirectory);

    for (const file of inputFileList) {
      if (!outputFileList.includes(file) || config.forceCleanCache) {
        const img = await sharp(path.join(config.inputDirectory, file));
        await img.resize({
          width: config.outputWidth,
          height: config.outputHeight,
        });

        if (config.outputFormat === ImageFormat.JPEG) {
          await img
            .jpeg({quality: config.outputQuality})
            .toFile(path.join(config.outputDirectory, file));
        } else if (config.outputFormat === ImageFormat.PNG) {
          await img
            .png({quality: config.outputQuality})
            .toFile(path.join(config.outputDirectory, file));
        }
      }
    }

    return fs.readdirSync(config.outputDirectory);
  }
}
Image Composition
Our CAPTCHA requires background and puzzle to work correctly. The background should be composited with a puzzle on the server-side to indicate where the user should move the puzzle on the client-side.
import {PuzzleCompositeConfig} from "../models/CompositeConfig";
import {ImageFormat} from "./Optimize";

const path = require('path');
const sharp = require('sharp');

export default class Background {
  private readonly filepath : string;

  constructor(filepath : string) {
    this.filepath = filepath;
  }

  public async compositePuzzle(config : PuzzleCompositeConfig) : Promise<Buffer> {
    const bg = await sharp(path.join(this.filepath));

    await bg
      .composite([{
        input: path.join(config.compositeFilepath),
        top: config.top,
        left: config.left,
        blend: "over"
      }]);

    if (config.outputFormat === ImageFormat.PNG) {
      return await bg.png({
        quality: config.outputQuality
      }).toBuffer();
    } else if (config.outputFormat === ImageFormat.JPEG) {
      return await bg.jpeg({
        quality: config.outputQuality
      }).toBuffer();
    }
  }
}
Now, when we have a background with destination puzzle, we need to prepare a puzzle for the client-side. This puzzle should look like the piece that we extract from the background. So, this time we are overlapping puzzle with the background at the correct position and with proper composite mode.
import {BackgroundCompositeConfig} from "../models/CompositeConfig";
import {ImageFormat} from "./Optimize";
const sharp = require('sharp');

export default class Puzzle {
  private readonly filepath : string;

  constructor(filepath : string) {
    this.filepath = filepath;
  }

  public async compositeBackground (config : BackgroundCompositeConfig) : Promise<Buffer> {
    const puzzle = await sharp(this.filepath);
    const background = sharp(config.compositeFilepath);

    await background.extract({
      left: config.left,
      top: config.top,
      width: config.puzzleWidth,
      height: config.puzzleHeight
    });

    await puzzle
      .composite([{
        input: await background.toBuffer(),
        blend: 'in'
      }]);


    if (config.outputFormat === ImageFormat.PNG) {
      return await puzzle.png({
        quality: config.outputQuality
      }).toBuffer();
    } else if (config.outputFormat === ImageFormat.JPEG) {
      return await puzzle.jpeg({
        quality: config.outputQuality
      }).toBuffer();
    }
  }
}
We also need to save coordinates for future verification. To do that, we can use Redis, which is fast, in-memory database. To quickly run Redis, we can use Docker.
import {UserDataResponse} from "../models/UserDataResponse";
import {UserDataRequest} from "../models/UserDataRequest";

const path = require('path');
const {getClientIp} = require('request-ip');
const crypto = require('crypto');

export default class UserDataController {
  static getRandomFileIndex(files: string[]) {
    return Math.floor(Math.random() * files.length);
  }

  static async getOrSetUserData(userDataRequest : UserDataRequest) : Promise<UserDataResponse> {
    const {req, redisClient, fileList, config} = userDataRequest;

    let userData: UserDataResponse;

    const clientIp = getClientIp(req);
    const key = crypto.createHash('md5')
      .update(clientIp)
      .digest("hex");

    if (await redisClient.ttl(key) > 0) {
      const userDataJSON = await redisClient.get(key);
      userData = JSON.parse(userDataJSON);
    } else {
      await redisClient.del(key);
      const imageIndex = this.getRandomFileIndex(fileList);
      const challenges = this.getRandomChallenges(config.challengeCount, config.challengeLength);

      userData = {
        backgroundPath: path.join(__dirname, '../../', config.backgroundImagesPath, fileList[imageIndex]),
        backgroundPuzzlePath: path.join(__dirname, '../../', config.backgroundPuzzlePath),
        clientPuzzlePath: path.join(__dirname, '../../', config.clientPuzzlePath),
        positionX: this.getRandomPuzzlePosition(0, 480, config.puzzleWidth),
        positionY: this.getRandomPuzzlePosition(32, 248, config.puzzleHeight),
        challenges,
        key
      };

      await redisClient.set(key, JSON.stringify(userData), 'EX', config.maxTTL);
    }

    return userData;
  }

  private static getRandomPuzzlePosition(min : number, max : number, puzzleSize : number) {
    return Math.round(Math.random() * ((max - puzzleSize) - (min + puzzleSize))) + min + puzzleSize;
  }
}
Now, when we have images, we can alter the client app to use them.
    const background = PIXI.Sprite.from(`${this.props.baseUrl}/bg.jpeg`);

    const puzzle = PIXI.Sprite.from(`${this.props.baseUrl}/puzzle.png`);

    const response = await fetch(`${this.props.baseUrl}/challenge`);
    const data = await response.json();
    this.setState(() => {
      return {
        challenges: data,
      };
    });
Also, we can make CAPTCHA more configurable by extending config options.
export type CaptchaConfig = {
  appendSelector: string,
  promptText: string,
  lockedText: string,
  savingText: string,
  privacyUrl: string,
  termsUrl: string,
  baseUrl: string,
  puzzleAlpha: number,
  canvasContainerId: string,
  leadingZerosLength: number,
  workerPath: string,
  responseRef: number
}

export type CaptchaResponse = {
  x: number,
  y: number,
  challenge: object
}

export interface ICaptcha {
  config: CaptchaConfig,
  getResponse(): Promise<CaptchaResponse>
}
Security of our CAPTCHA relies on different Web APIs, image recognition and leading-zero mechanism similar to this in hashcash (spam prevention tool). The client should receive an array full of challenges and find a hash which results with a required number of zeros in front of the string. Of course, the bot may extract this hash and operate on their machines to find prefix, but it costs a little time to calculate a hash, and it requires an effort. So it is not about making it impossible but cost-ineffective.
To make the leading-zero challenge, we will prepare another endpoint which generates few long strings, saves them inside Redis and returns to the user.
// ...
  private static getRandomChallenges(challengeCount : number, challengeLength : number) {
    const challenges = [];
    for (let i = 0; i < challengeCount; i++) {
      challenges.push(crypto.randomBytes(challengeLength)
        .toString('base64'));
    }
    return challenges;
  }
// ...
On the client-side, we are going to make the process of finding leading zero asynchronous. To achieve that we can separate algorithm for finding prefix answers to a different file and run it with Worker API which uses different thread and will not block the user interface. The non-blocking operation may be crucial for mobile devices which still have less performance than desktops.
async getResponse() : Promise<CaptchaResponse> {
    return new Promise(((resolve, reject) => {
      if (this.state.progressState !== ProgressState.INITIAL) {
        reject('Already responded');
      }

      this.workerStart();

      const worker = new Worker(this.props.workerPath);
      worker.postMessage({
        challenges: this.state.challenges,
        leadingZerosLength: this.props.leadingZerosLength
      });

      worker.addEventListener('message', (event : MessageEvent) => {
        if (event.data.type === 'next') {
          this.setWorkerProgress(event.data['solved'], event.data['total']);
        } else if (event.data.type === 'success') {
          this.workerEnd();

          resolve({
            x: this.state.puzzle.x - this.state.puzzle.width / 2,
            y: this.state.puzzle.y - this.state.puzzle.height / 2,
            challenge: event.data['arr']
          });
        }
      });
    }));
  }
Worker file:
/**
 * [js-sha256]{@link https://github.com/emn178/js-sha256}
 *
 * @version 0.9.0
 * @author Chen, Yi-Cyuan [emn178@gmail.com]
 * @copyright Chen, Yi-Cyuan 2014-2017
 * @license MIT
 */
!function(){"use strict";function t(t,i)!function(){"use strict";function t(t,i){i?(d[0]=d[16]=d[1]=d[2]=d[3]=d[4]=d[5]=d[6]=d[7]=d[8]=d[9]=d[10]=d[11]=d[12]=d[13]=d[14]=d[15]=0,this.blocks=d): ... // https://github.com/emn178/js-sha256

/**
 * CAPTCHA Worker
 * @description Part of devcaptcha client
 * @param event
 */
self.onmessage = (event) => {
  const arr = [];
  for (const challenge of event.data.challenges) {
    let prefix = 0;
    while (true) {
      const answer = sha256(prefix + challenge);
      if (answer.startsWith('0'.repeat(event.data.leadingZerosLength))) {
        arr.push({
          challenge,
          prefix
        });
        self.postMessage({
          type: 'next',
          solved: arr.length,
          total: event.data.challenges.length
        });
        break;
      }
      prefix++;
    }
  }

  self.postMessage({
    type: 'success',
    arr
  });
}
To make better UX feeling we can lock CAPTCHA from the moment when it is not interactive and show real progress of solving.
  workerStart() {
    this.setState(() => {
      return {
        progressState: ProgressState.SAVING
      };
    }, () => {
      const {puzzle, lockOverlay, stepIndicator, progressText} = this.state;
      puzzle.interactive = false;
      puzzle.buttonMode = false;
      lockOverlay.alpha = 0.5;
      stepIndicator.visible = true;
      progressText.visible = true;

      this.setWorkerProgress(0, 1);
    });
  }

  setWorkerProgress(solved : number, total : number) {
    const {stepIndicator, progressText, loadingSpinner} = this.state;
    progressText.text = Math.ceil(solved/total * 100) + '%';
    if (solved < total) {
      stepIndicator.text = this.props.savingText;
      loadingSpinner.visible = true;
    } else {
      stepIndicator.text = this.props.lockedText;
      loadingSpinner.visible = false;
    }
  }

  workerEnd() {
    this.setState(() => {
      return {
        progressState: ProgressState.LOCKED
      };
    }, () => {
      this.setWorkerProgress(1, 1);
    });
  }
We can also add dark overlay, loading spinner and helper texts:
    const lockOverlay = new PIXI.Graphics();
    lockOverlay.beginFill(0x000000);
    lockOverlay.alpha = 0;
    lockOverlay.drawRect(0, 0,
      this.state.app.view.width,
      this.state.app.view.height
    );
    lockOverlay.endFill();
    this.state.app.stage.addChild(lockOverlay);

    const loadingSpinner = PIXI.Sprite.from(`${this.props.baseUrl}/static/loading.png`);
    loadingSpinner.anchor.set(0.5, 0.5);
    loadingSpinner.visible = false;
    loadingSpinner.x = this.state.app.view.width / 2;
    loadingSpinner.y = this.state.app.view.height / 2;
    this.state.app.stage.addChild(loadingSpinner);

    this.state.app.ticker.add(delta => {
      loadingSpinner.rotation += 0.1 * delta;
    });

    const progressText = new PIXI.Text('0%', {
      fontFamily: 'Arial',
      fontSize: 24,
      fill: '#ffffff'
    });
    progressText.visible = false;
    progressText.anchor.set(0.5, 0.5);
    progressText.x = this.state.app.view.width / 2;
    progressText.y = this.state.app.view.height / 2 + 12;
    this.state.app.stage.addChild(progressText);

    const stepIndicator = new PIXI.Text('Saving...', {
      fontFamily: 'Arial',
      fontSize: 16,
      fill: '#ffffff',
    });
    stepIndicator.visible = false;
    stepIndicator.anchor.set(0.5, 0.5);
    stepIndicator.x = this.state.app.view.width / 2;
    stepIndicator.y = this.state.app.view.height / 2 - 12;
    this.state.app.stage.addChild(stepIndicator);

    this.setState(() => {
      return {
        puzzle,
        lockOverlay,
        progressText,
        stepIndicator,
        loadingSpinner
      }
    });
To run this code we need to prepare public method in CAPTCHA class and run method inside App component. This may be a little tricky because React CAPTCHA in our case it’s not static so we can’t force application to run this directly. Instead, we can prepare helper array and bind it to the global context as we do with CAPTCHA class, then push reference of internal method from each instance and run from a public instance method.
// App.tsx
// constructor
window.__getDevCaptchaResponses.push(this.getResponse);
// index.tsx
import * as React from "react";
import * as ReactDOM from "react-dom";

import { App } from "./components/App";
import {CaptchaConfig, CaptchaResponse, ICaptcha} from "./models/Captcha";

class DevCaptcha implements ICaptcha {
  readonly config : CaptchaConfig;
  readonly responseRef : number = 0;

  public constructor(config : CaptchaConfig) {
    this.config = config;

    if (window.__getDevCaptchaResponses) {
      this.responseRef = window.__getDevCaptchaResponses.length;
    }

    ReactDOM.render(<App {...this.config} responseRef={this.responseRef} />, document.querySelector(this.config.appendSelector));
  }

  public async getResponse() : Promise<CaptchaResponse> {
    return window.__getDevCaptchaResponses[this.responseRef]();
  }
}

declare global {
  interface Window {
    DevCaptcha: ICaptcha | object,
    __getDevCaptchaResponses: Array<() => Promise<CaptchaResponse>>
  }
}

let _window : Window = window;
_window['DevCaptcha'] = DevCaptcha;
_window['__getDevCaptchaResponses'] = [];
At this moment you should be able to run your CAPTCHA and check user humanity:
<!DOCTYPE html>
<html>
<head>
    <meta charset="UTF-8" />
    <title>Hello React!</title>
</head>
<body>

<div class="h-100 flex center">
    <div id="captcha"></div>
</div>

<div class="h-100 flex center">
    <div id="captcha2"></div>
</div>

<script crossorigin src="https://unpkg.com/react@16/umd/react.development.js"></script>
<script crossorigin src="https://unpkg.com/react-dom@16/umd/react-dom.development.js"></script>
<script crossorigin src="https://cdnjs.cloudflare.com/ajax/libs/pixi.js/5.1.3/pixi.min.js"></script>
<script src="main.js"></script>
<script>
    const devcaptcha = new DevCaptcha({
      appendSelector: '#captcha',
      promptText: 'Move the puzzle to the correct position to solve captcha',
      lockedText: 'Locked',
      savingText: 'Wait',
      privacyUrl: 'https://example.com',
      termsUrl: 'https://example.com',
      baseUrl: 'http://localhost:8081',
      puzzleAlpha: 0.9,
      canvasContainerId: 'devcaptcha-container',
      leadingZerosLength: 3,
      workerPath: './worker.js'
    });
</script>
</body>
</html>
UX/UI Improvements
Recently I asked you for advice about UI/UX and you responded with a lot of great opinions!
Some of you recommended making the puzzle more visible, we can do that by changing the source puzzle image. I made it blurred to better blend with the background, however, we can make more sharp edges to be better visible for people (but remember, for software like OpenCV and edge detection tools also!).
Also, you recommended making canvas borders more rounded. Because canvas is an element of HTML we can use CSS to do this.
canvas {
            box-shadow: 0px 0px 10px 0px rgba(0,0,0,0.75);
            border-radius: 5px;
        }
You recommended changing the submit button as well. And because we have a public method to run CAPTCHA programmable we do not need it anymore. So we can remove button, text on it and icon.
To make loading of this CAPTCHA we can add fade-out effect:
    const fadeOut = new PIXI.Graphics();
    fadeOut.beginFill(0xffffff);
    fadeOut.drawRect(0, 0,
      this.state.app.view.width,
      this.state.app.view.height
    );
    fadeOut.endFill();
    this.state.app.stage.addChild(fadeOut);

    for (let i = 0; i < 100; i++) {
      fadeOut.alpha -= i/100;
      await wait(16);
    }
Final Result
Uff. And this is how we create our fast, responsive CAPTCHA mechanism! 🥳 You can use it now to secure your website, forum or blog. To make it even more secure you can change some parts of the algorithm, so it will be unique and tailored for your site.

Full source code you can find at GitHub.
Video Demo
After a long time of working on custom CAPTCHA, I made it and I used it to pass one of the subjects on studies.
CAPTCHA is made with TypeScript, React, PIXI and Node. CAPTCHA relies on a server-side mechanism for generating and verification challenge.
Here it is:
Thank you for this long journey. Maybe in the future, we will work on another security solution.
This post was originally published on Dev.to