Making a slavic mythology strategy game in Unity
Open source code and playable link
A few days ago I had written about starting my new project for studies. Since then, I have created the basic foundations and implemented the core mechanisms. In this comprehensive article, I’m going to show what I accomplished throughout the entire development journey and the code behind the various game systems. 😀
To briefly remind what the project is about:
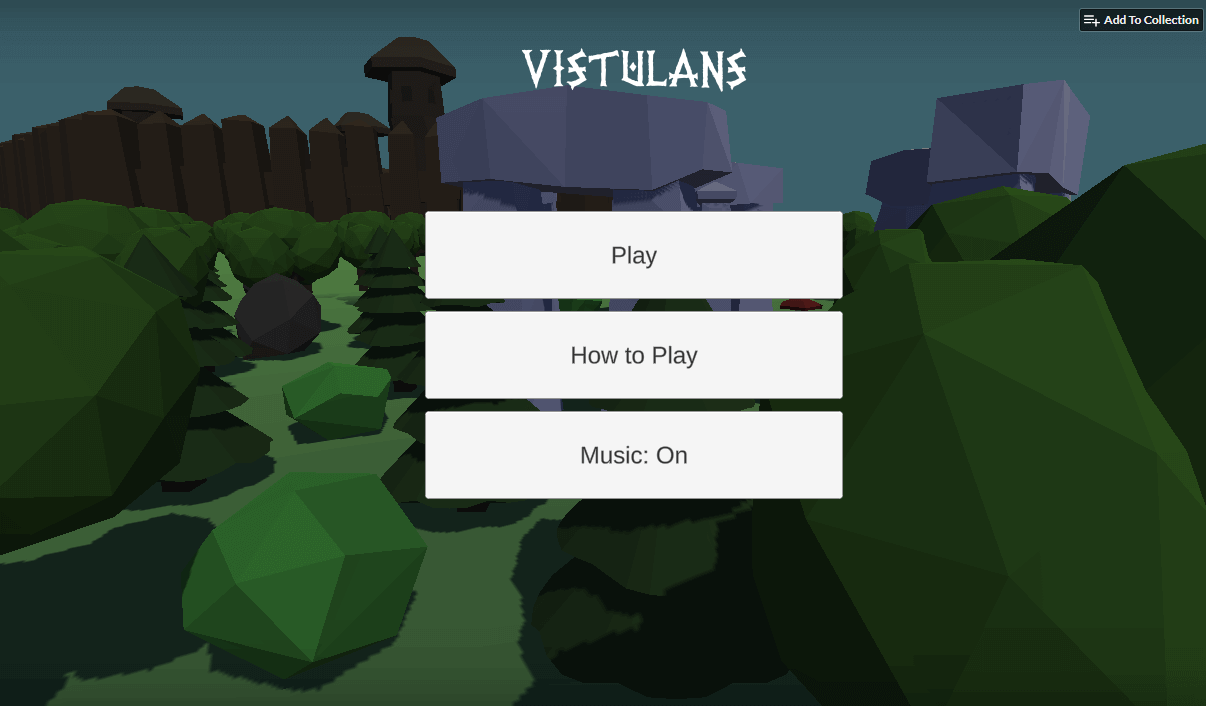
My game named Vistulans is derived from Vistula (Latin name of Wisła - large and long river in Poland and Slovakia, and historical Slavic tribes near) and is inspired by Slavic mythology and graph-based strategy games. The game is written in C# with Unity Engine.
Days 1-7: Basic Mechanisms
Core Game Systems
The project began with implementing the fundamental mechanisms described in the Game Design Document:
- Move units between vertices
- Increment units and resources based on vertex level and owner
- Vertices should have different types, not only villages (unit spawners)
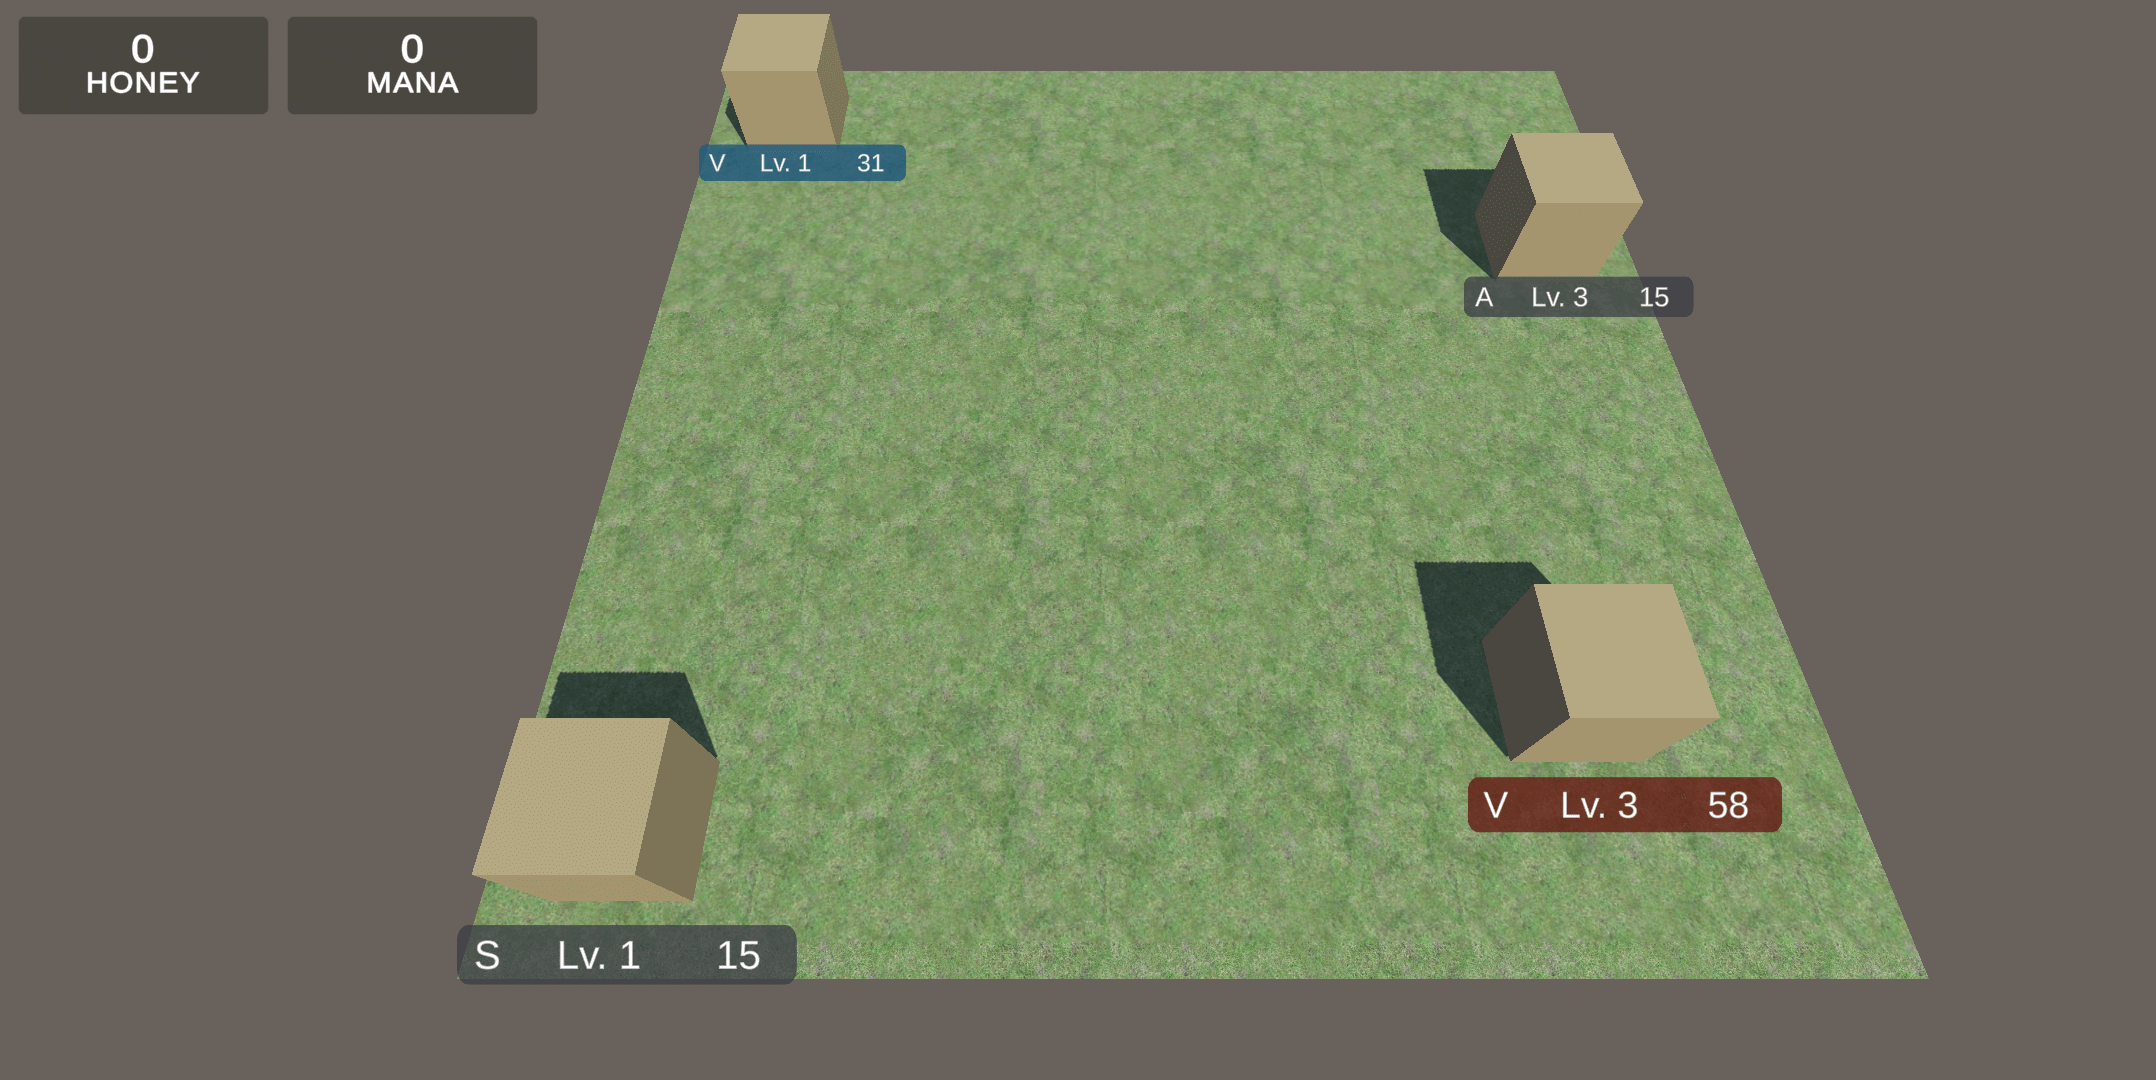
I started by creating a new scene with a plane for the ground, adding a seamless grass texture and setting up the camera to face the plane at a small degree.
Then I added cubes as placeholders for representing vertices until I could model something better in Blender. Each vertex had a vertex controller script for managing its properties.
It contains information about Id (unique integer of vertex, used for edges), Vertex Type (enum to distinguish village, shrine and apiary), X and Y position (for future travelling mechanics), Level (information about how fast vertex should produce goods), connections (connected vertices), army power (number of units at vertex), owner (which player - human or AI owns the vertex), and a few other less important properties.
    public GameObject BadgeObject;

    // ...

    public int Id;

    public VertexType Type;

    public int X;

    public int Y;

    public int Level;

    public List<GameObject> Connections;

    public int ArmyPower;

    public OwnerType Owner;

    [SerializeField]
    private bool _selected = false;

    // ...
Having created vertices and connections between them, I prepared a simple graph. However, because this game will have many levels until release and I prefer a programmable approach to design, I decided to load levels from config files. Thanks to this, I can write a level editor and give it to gamers or at least use it myself to prepare more levels for the players.
Each level is built of lists of vertices, edges and metadata. Background is an integer index of game object or 3D mesh from a future list. The background is going to be visible in the current plane.
using System;
using System.Collections.Generic;

[Serializable]
public class LevelConfig
{
    public List<Level> levels;
}

[Serializable]
public class Level
{
    public string title;
    public int background;
    public List<VertexConfig> vertices;
    public List<EdgeConfig> edges;
}

[Serializable]
public class EdgeConfig
{
    public int a;
    public int b;
}

[Serializable]
public class VertexConfig
{
    public int id, type, x, y, level, owner, power;
}
Loading the configuration from JSON file by parsing to the above class instance and instantiating vertices in the world. The position of each vertex is aligned with constants, and then properties are assigned from the configuration.
    // ...
    void Start()
    {
        TextAsset levelConfigContent = Resources.Load<TextAsset>("Config/levels");
        Debug.Log($"Loaded level configuration: {levelConfigContent}");
        LevelConfig levelConfig = JsonUtility.FromJson<LevelConfig>(levelConfigContent.text);

        foreach (VertexConfig vertexConfig in levelConfig.levels[0].vertices)
        {
            GameObject newVertex = GameObject.Instantiate(VertexObject, new Vector3(vertexConfig.x * 1f, 0.5f, -vertexConfig.y * 1f), Quaternion.identity);
            newVertex.GetComponent<VertexController>().X = vertexConfig.x;
            newVertex.GetComponent<VertexController>().Y = vertexConfig.y;
            newVertex.GetComponent<VertexController>().Owner = (OwnerType)vertexConfig.owner;
            newVertex.GetComponent<VertexController>().Type = (VertexType)vertexConfig.type;
            newVertex.GetComponent<VertexController>().ArmyPower = vertexConfig.power;
            newVertex.GetComponent<VertexController>().Level = 0;
            newVertex.GetComponent<VertexController>().Id = vertexConfig.id;
            newVertex.tag = "Vertex";
            newVertex.name = $"vertex{vertexConfig.id}";
        }

        foreach (EdgeConfig connection in levelConfig.levels[0].edges)
        {
            GameObject vertexA = GameObject.Find($"vertex{connection.a}");
            GameObject vertexB = GameObject.Find($"vertex{connection.b}");

            vertexA.GetComponent<VertexController>().Connections.Add(vertexB);
            vertexB.GetComponent<VertexController>().Connections.Add(vertexA);
        }
    }
    // ...
Sample configuration file:
{
  "levels": [
    {
      "title": "Test map",
      "background": 0,
      "vertices": [
        {
          "id": 0,
          "type": 0,
          "x": -4,
          "y": -4,
          "level": 0,
          "owner": 1,
          "power": 25
        },
        {
          "id": 1,
          "type": 0,
          "x": 4,
          "y": -2,
          "level": 0,
          "owner": 2,
          "power": 15
        },
        {
          "id": 2,
          "type": 1,
          "x": 3,
          "y": 3,
          "level": 0,
          "owner": 0,
          "power": 40
        },
        {
          "id": 3,
          "type": 0,
          "x": -4,
          "y": 4,
          "level": 0,
          "owner": 0,
          "power": 15
        }
      ],
      "edges": [
        {
          "a": 0,
          "b": 1
        },
        {
          "a": 1,
          "b": 2
        },
        {
          "a": 2,
          "b": 3
        },
        {
          "a": 0,
          "b": 3
        }
      ]
    }
  ]
}
The above configuration creates 4 vertices, each connected with two others, positioned at the corners.
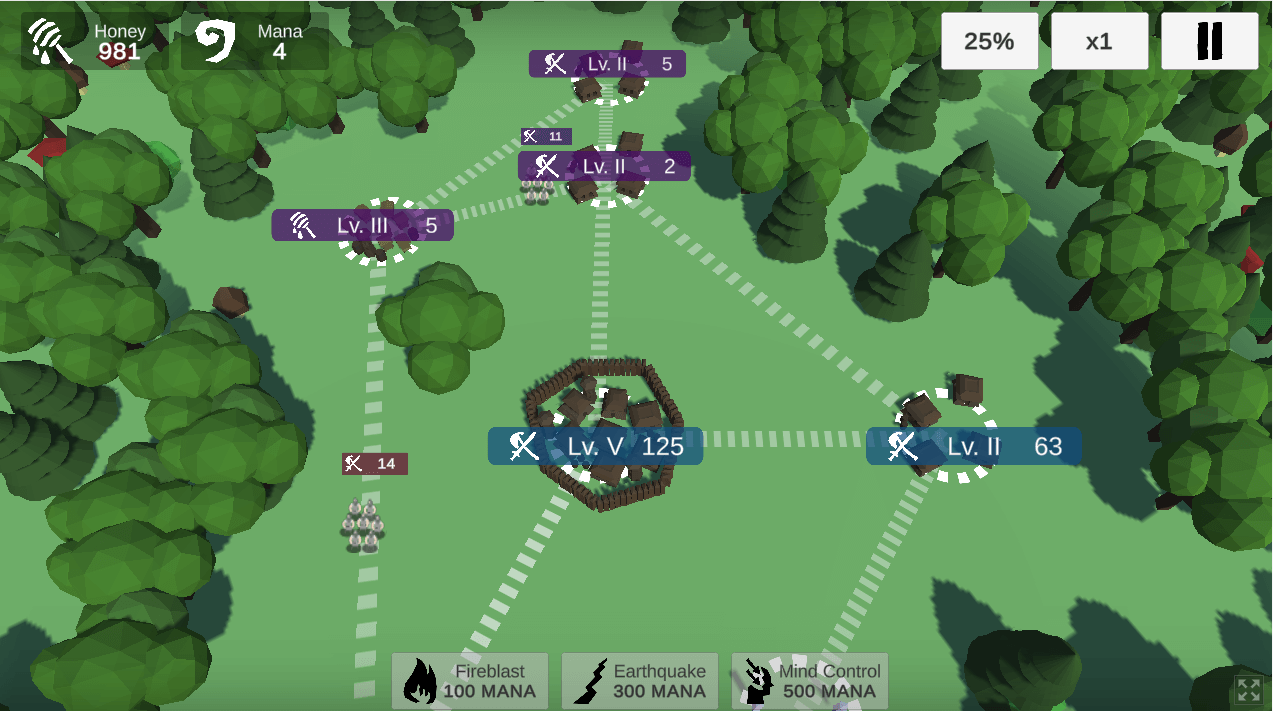
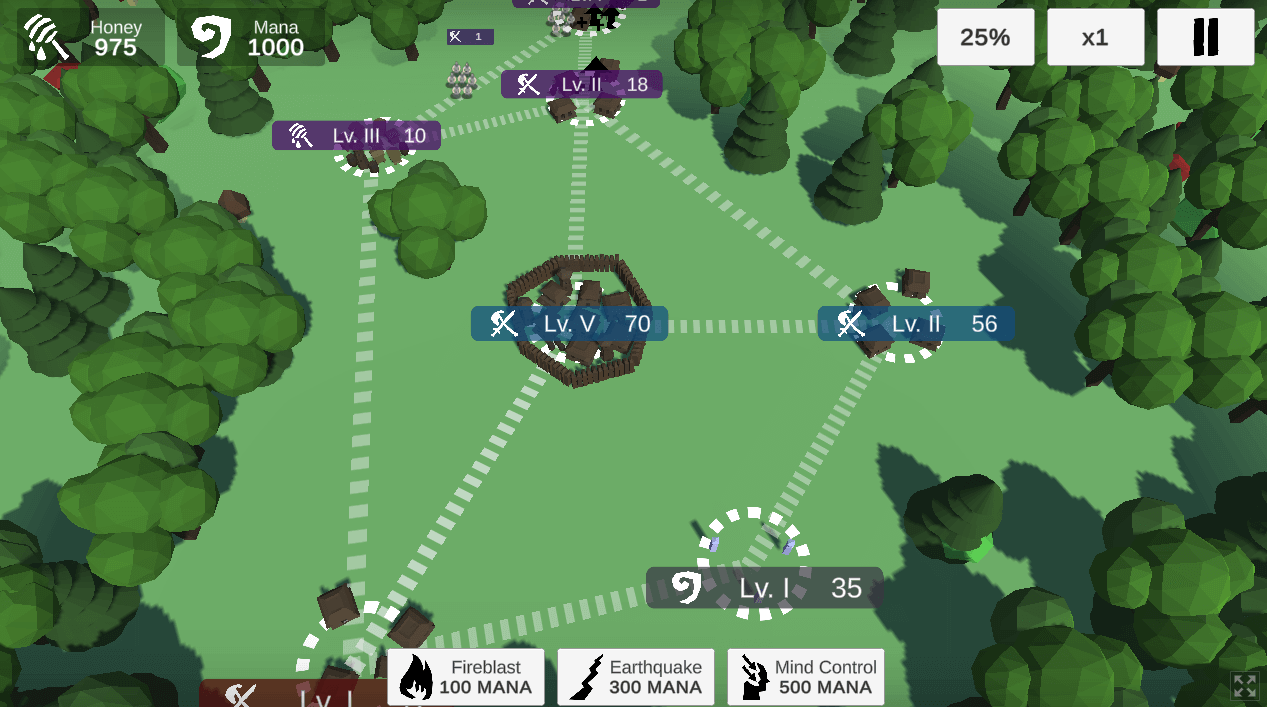
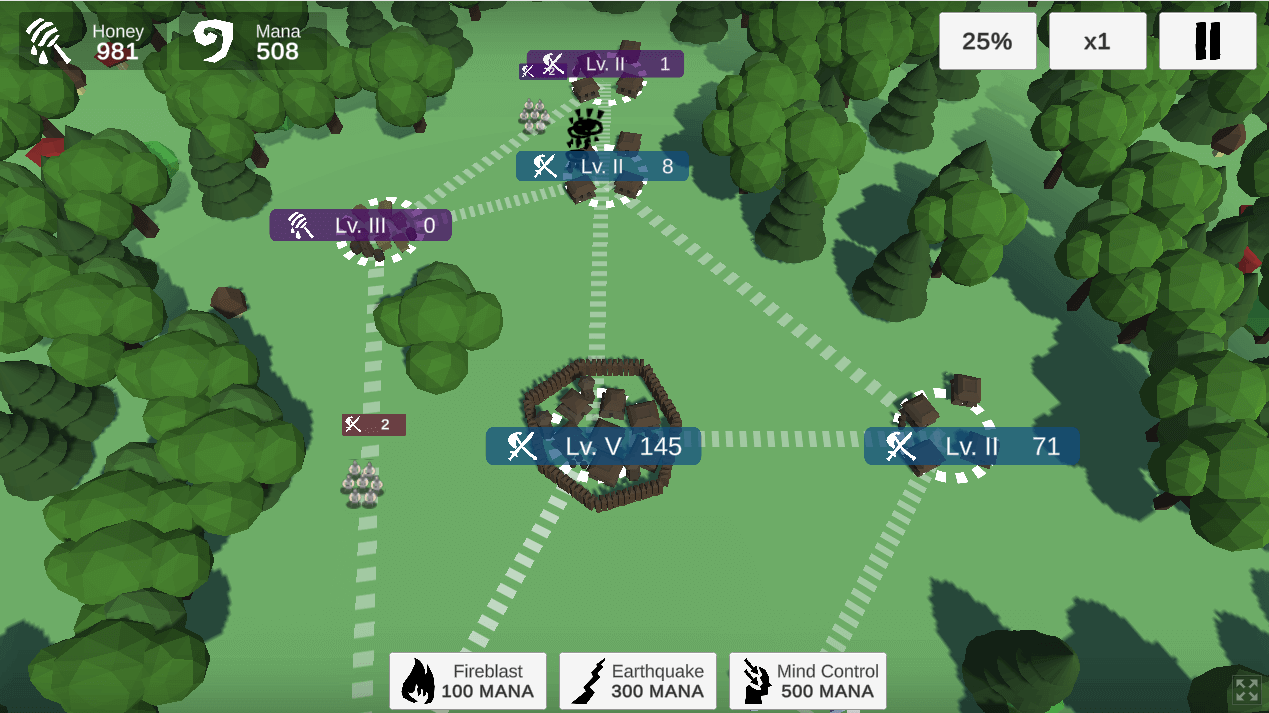
When I had created the vertices, I worked on travelling between nodes. This was straightforward - touching a vertex sets and unsets origin and target. Touching the target when having an origin instantiates a new army unit object in the direction of the target. Army power is currently constant and set to 50% of the vertex army power. It also requires 2 or more units to avoid leaving an empty vertex, which would prevent problems when writing simple AI.
    // ...
    public void OnVertexTouch(int id)
    {
        if (_touchedVertexAId == -1)
        {
            _touchedVertexAId = id;
        } else
        {
            _touchedVertexBId = id;
        }
    }

    public void FixedUpdate()
    {
        if (_touchedVertexAId != -1 && _touchedVertexBId == -1)
        {
            GameObject selectedVertex = GameObject.Find($"vertex{_touchedVertexAId}");

            selectedVertex.GetComponent<Renderer>().material.color = Color.white;

            foreach (GameObject connectedVertex in selectedVertex.GetComponent<VertexController>().Connections)
            {
                connectedVertex.GetComponent<Renderer>().material.color = Color.yellow;
            }
        }

        if (_touchedVertexAId != -1 && _touchedVertexBId != -1)
        {
            GameObject selectedVertex = GameObject.Find($"vertex{_touchedVertexAId}");

            foreach (GameObject possibleVertex in selectedVertex.GetComponent<VertexController>().Connections)
            {
                if (possibleVertex.GetComponent<VertexController>().Id == _touchedVertexBId)
                {
                    if (selectedVertex.GetComponent<VertexController>().ArmyPower > 1)
                    {
                        int armyPowerToSend = selectedVertex.GetComponent<VertexController>().ArmyPower / 2;
                        selectedVertex.GetComponent<VertexController>().ArmyPower -= armyPowerToSend;

                        SendArmy(_touchedVertexAId, _touchedVertexBId, armyPowerToSend);
                        Debug.Log($"Sent unit from {_touchedVertexAId} to {_touchedVertexBId}");
                    }
                }
            }

            foreach (GameObject vertex in GameObject.FindGameObjectsWithTag("Vertex"))
            {
                vertex.GetComponent<Renderer>().material.color = Color.clear;
            }

            _touchedVertexAId = -1;
            _touchedVertexBId = -1;
        }
    }

    public void SendArmy(int origin, int target, int amount)
    {
        GameObject vertexA = GameObject.Find($"vertex{origin}");
        GameObject vertexB = GameObject.Find($"vertex{target}");

        if (vertexA.GetComponent<VertexController>().ArmyPower >= amount)
        {
            Vector3 spawnPosition = vertexA.gameObject.transform.position;
            spawnPosition.y = 0.25f;
            GameObject newArmy = GameObject.Instantiate(ArmyObject, spawnPosition, Quaternion.identity);
            newArmy.GetComponent<ArmyController>().Owner = vertexA.GetComponent<VertexController>().Owner;
            newArmy.GetComponent<ArmyController>().ArmyPower = amount;
            newArmy.GetComponent<ArmyController>().Origin = origin;
            newArmy.GetComponent<ArmyController>().Target = target;
        }
        else
        {
            // insufficient army power
        }
    }
    // ...
The army should interact with enemies and other vertices. On collision with an enemy, the army with more unit power wins and the remainder survives. The losing army is destroyed. When an army collides with a vertex, it removes enemy army power and switches ownership when the power drops to zero or below.
Army objects shouldn’t interact with other armies sent by the same owner and should interact exactly once with enemy armies. To achieve this, I locked execution of the process in collided objects.
using UnityEngine;

public class ArmyController : MonoBehaviour
{
    public int Origin = -1;

    public int Target = -1;

    private GameObject _targetObject;

    public int ArmyPower = 0;

    public OwnerType Owner = OwnerType.Wild;

    public float MovementSpeed = 1f;

    public bool AlreadyTriggering = false;

    void UpdateTarget(int newTarget)
    {
        Target = newTarget;
        _targetObject = GameObject.Find($"vertex{Target}");
    }

    void FixedUpdate()
    {
        if (_targetObject == null)
        {
            UpdateTarget(Target);
        }
        else
        {
            Vector3 targetDirection = _targetObject.gameObject.transform.position - transform.position;
            targetDirection.y = 0;
            transform.rotation = Quaternion.LookRotation(targetDirection);
            gameObject.transform.position += gameObject.transform.forward * MovementSpeed * Time.deltaTime;
        }
    }

    private void OnTriggerExit(Collider other)
    {
        if (other.gameObject.tag == "Army")
        {
            other.gameObject.GetComponent<ArmyController>().AlreadyTriggering = false;
        }
    }

    private void OnTriggerEnter(Collider other)
    {
        if (AlreadyTriggering == false)
        {
            if (other.gameObject.tag == "Vertex")
            {
                if (other.gameObject.GetComponent<VertexController>().Id != Origin)
                {
                    if (other.gameObject.GetComponent<VertexController>().Owner == Owner)
                    {
                        other.gameObject.GetComponent<VertexController>().ArmyPower += ArmyPower;
                    }
                    else
                    {
                        other.gameObject.GetComponent<VertexController>().ArmyPower -= ArmyPower;

                        if (other.gameObject.GetComponent<VertexController>().ArmyPower <= 0)
                        {
                            other.gameObject.GetComponent<VertexController>().Owner = Owner;
                            other.gameObject.GetComponent<VertexController>().ArmyPower = Mathf.Abs(other.gameObject.GetComponent<VertexController>().ArmyPower);
                        }
                    }

                    GameObject.Destroy(gameObject);
                }
            }
            else if (other.gameObject.tag == "Army")
            {
                if (other.gameObject.GetComponent<ArmyController>().AlreadyTriggering == false && other.gameObject.GetComponent<ArmyController>().Owner != Owner)
                {
                    other.gameObject.GetComponent<ArmyController>().AlreadyTriggering = true;

                    if (other.gameObject.GetComponent<ArmyController>().ArmyPower < ArmyPower)
                    {
                        ArmyPower -= other.gameObject.GetComponent<ArmyController>().ArmyPower;

                        GameObject.Destroy(other.gameObject);

                    }
                    else if (other.gameObject.GetComponent<ArmyController>().ArmyPower > ArmyPower)
                    {
                        other.gameObject.GetComponent<ArmyController>().ArmyPower -= ArmyPower;

                        GameObject.Destroy(gameObject);
                    }
                    else
                    {
                        GameObject.Destroy(gameObject);
                        GameObject.Destroy(other.gameObject);
                    }
                }
            }
        }
    }
}
Wooohooo! This was the moment when the first feature was completed! A player can now move units between vertices and fight with others (but still controlled by a human).
Next I spent working on simple badges with information about vertices. I attached a billboard script to make them face the camera and created badges on canvas. Each badge is made of a few TextMeshPro objects and a sprite behind them. The sprite has a different look based on the owner of the vertex.
using TMPro;
using UnityEngine;

public class BadgeController : MonoBehaviour
{
    public int Level;
    public int ArmyPower;
    public VertexType Type;
    public OwnerType Owner;

    public GameObject LevelText;
    public GameObject PowerText;
    public GameObject TypeText;
    public GameObject Background;

    public Sprite WildBackground;
    public Sprite PlayerBackground;
    public Sprite EnemyOneBackground;
    public Sprite EnemyTwoBackground;
    public Sprite EnemyThreeBackground;

    // ...
}
Finally, I added a camera controller with zoom in/out and moving around. Because the game should work both on Android/iOS and PC like the new games from the Civilization series, it checks if the user is already touching. Otherwise, it checks mouse state. Part of this script about touch input was inspired by an answer on Stack Overflow: Jinjinov
            // ...
            if (Input.touchCount == 1 && _isZooming == false)
            {
                Touch touch0 = Input.GetTouch(0);
                _isTouchMove = touch0.phase == TouchPhase.Moved;
                _isTouchDown = touch0.phase == TouchPhase.Stationary;

                if (_isTouchDown)
                {
                    _startScreenPosition = touch0.position;
                    _cameraPosition = transform.position;
                }

                if (_isTouchMove == true)
                {
                    _isDragging = true;

                    _currentScreenPosition = touch0.position;
                    _currentScreenPosition.z = _startScreenPosition.z = _cameraPosition.y;
                    Vector3 direction = Camera.main.ScreenToWorldPoint(_currentScreenPosition) - Camera.main.ScreenToWorldPoint(_startScreenPosition);
                    direction = direction * -1;
                    _targetPosition = _cameraPosition + direction;

                    _isMovingTo = true;
                }
            }

            // ...

            if (Input.GetMouseButtonDown(0))
            {
                _startScreenPosition = Input.mousePosition;
                _cameraPosition = transform.position;
            }

            if (Input.GetMouseButton(0))
            {
                _currentScreenPosition = Input.mousePosition;
                _currentScreenPosition.z = _startScreenPosition.z = _cameraPosition.y;
                Vector3 direction = Camera.main.ScreenToWorldPoint(_currentScreenPosition) - Camera.main.ScreenToWorldPoint(_startScreenPosition);
                direction = direction * -1;
                _targetPosition = _cameraPosition + direction;

                _isMovingTo = true;
            }

            // ...

        if (_isMovingTo)
        {
            _targetPosition.y = transform.position.y;
            transform.position = _targetPosition;

            if (transform.position == _targetPosition)
            {
                _isMovingTo = false;
            }
        }

        // ...

    void Zoom(bool zoomIn = true)
    {
        if (zoomIn)
        {
            gameObject.transform.Translate(new Vector3(0, -1, 2) * Time.deltaTime * _zoomSpeed);
        }
        else
        {
            gameObject.transform.Translate(new Vector3(0, 1, -2) * Time.deltaTime * _zoomSpeed);
        }
    }
Finally, I added incrementing of resources based on vertex type and owner:
    // ...
    public int[] Mana;
    public int[] Honey;
    // ...
    // ...
    void Start()
    {
        _badgeObject = GameObject.Instantiate(BadgeObject, gameObject.transform.position - new Vector3(0, 1f, 2f), Quaternion.identity);

        InvokeRepeating("IncreaseUnits", 2.0f, 2.0f);

        if (_mechanismObject == null)
        {
            _mechanismObject = GameObject.Find("Mechanism");
        }
    }

    void IncreaseUnits()
    {
        if (Owner != OwnerType.Wild)
        {
            switch (Type)
            {
                case VertexType.Shrine:
                    _mechanismObject.GetComponent<GameplayController>().Mana[(int)Owner - 1] += Level + 1;
                    break;
                case VertexType.Village:
                    ArmyPower += Level + 1;
                    break;
                case VertexType.Apiary:
                    _mechanismObject.GetComponent<GameplayController>().Honey[(int)Owner - 1] += Level + 1;
                    break;
            }
        }
    }
This week was totally awesome! I was excited to work further on the game.
Days 8-14: Miracles, Spells and Polish Life
Hello everyone, I made some significant changes in my game development project, so it’s time for the second part of the progress diary 😜 It was a busy and weird week since I got flu, participated in a charity event and got distracted by study exercises so I had less time to work on Vistulans than I planned. Even then, I created milestone changes in the project and in this article, I am going to write about them.
Miracles and Spells
Most of the time I spent working on miracles inspired by those from the Black and White game series by Peter Molyneux and Lionhead. I first created UI buttons for casting spells, then the mechanics under the hood. I placed three buttons on the bottom of the screen as placeholders. Before the engine casts a spell, it checks if only one vertex is selected and the special property is set to the index of the spell. It can only be set in different mode, so based on value != -1 I changed the overlay on-screen to distinguish default and casting modes, making the screen more violet and magical 🧚♀️.
    // ...
    public void FixedUpdate()
    {
        if (SelectedVertexA != null && SelectedVertexB == null && SpellToCast != -1)
        {
            switch(SpellToCast)
            {
                case 0:
                    CastOffensiveSpell(SelectedVertexA);
                    Mana[0] -= 100;
                    break;
                case 1:
                    CastEarthquakeSpell(SelectedVertexA);
                    Mana[0] -= 300;
                    break;
                case 2:
                    CastTakeoverSpell(SelectedVertexA, OwnerType.Player);
                    Mana[0] -= 500;
                    break;
            }

            SpellToCast = -1;
            _graphController.ClearSelection();
        }
    }

    public void SetSpellToCast(int spellIndex = -1)
    {
        if (spellIndex == 0 && Mana[0] >= 100
            || spellIndex == 1 && Mana[0] >= 300
            || spellIndex == 2 && Mana[0] >= 500)
        {
            if (spellIndex == SpellToCast)
            {
                SpellToCast = -1;
            }
            else
            {
                SpellToCast = spellIndex;
            }
        }
        else
        {
            Debug.Log("Insufficient mana");
        }

        _graphController.ClearSelection();
    }
    // ...

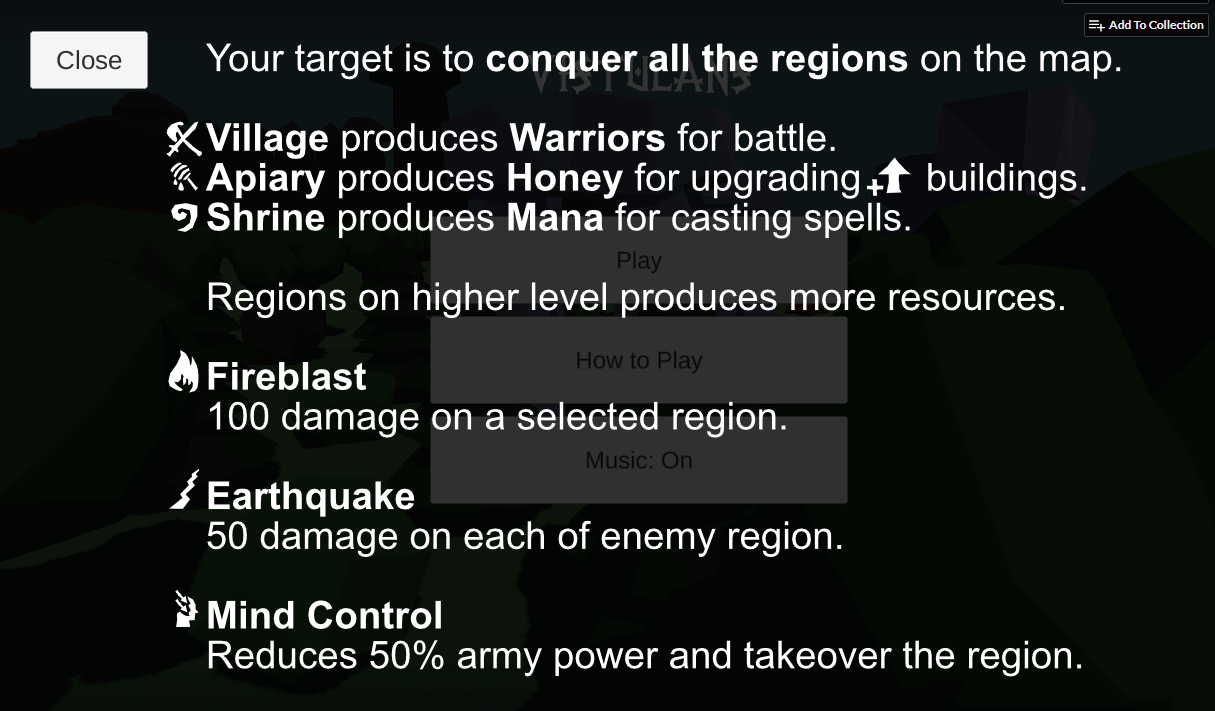
The first spell is a typical offensive spell like a fireball or something. In mechanics terms, this spell removes up to 100 army power from the vertex and leaves 1 unit if army power goes below or equal to 0. So it’s a great spell for making an enemy vertex weaker and attacking like a wave.
    // ...
    public void CastOffensiveSpell(VertexController vertex)
    {
        vertex.ArmyPower -= 100;

        if (vertex.ArmyPower < 1)
        {
            vertex.ArmyPower = 1;
        }
    }
    // ...
The second spell has an area of effect - it’s not affecting just a single vertex but all vertices of the enemy. It’s extremely powerful and costs much more mana than the previous one. The earthquake (as I named it) removes up to 50 army power from each vertex of the selected player, with future animation of an earthquake.
    // ...
    public void CastEarthquakeSpell(VertexController vertex)
    {
        foreach (VertexController tempVertex in _vertexList)
        {
            if (tempVertex.Owner == vertex.Owner)
            {
                tempVertex.ArmyPower -= 50;

                if (tempVertex.ArmyPower < 1)
                {
                    tempVertex.ArmyPower = 1;
                }
            }
        }
    }
    // ...
The third and last spell is inspired by the Siren miracle from Black & White 2 game. It was extremely hard to cast this spell, but it was totally worth it. Takeover (temporary name) removes half of the army power from vertices and the remainder falls to the player side, also changing the owner of the vertex. It may be a game-changer when one of the enemies has a well-upgraded vertex with a lot of army on it.
    // ...
    public void CastTakeoverSpell(VertexController vertex, OwnerType whoCast)
    {
        vertex.ArmyPower -= (int)Mathf.Floor(vertex.ArmyPower * 0.5f);

        if (vertex.ArmyPower < 1)
        {
            vertex.ArmyPower = 1;
        }

        vertex.Owner = whoCast;
    }
    // ...
At this moment I broke working on the game for a moment because I had been working on a charity event and raising money for lonely and sick people with the local organisation. It was a spectacular success and I felt much better after this event. However, after the event, I got flu viruses, so the next few days I spent with fever in bed sleeping over 18 hours per day.
Back to game development after creating spells and when I cured the influenza a little, I added different colours for army cubes for development purposes and study showcase. We had been presenting prototypes of our games. Other games were very interesting. One guy created a simple shooter with funny chickens, other team a game about gathering resources and building houses, another team a simple but nice looking 2D point and click game. The last presented game was VR fighting like Gorn and in my opinion has great potential 😃.
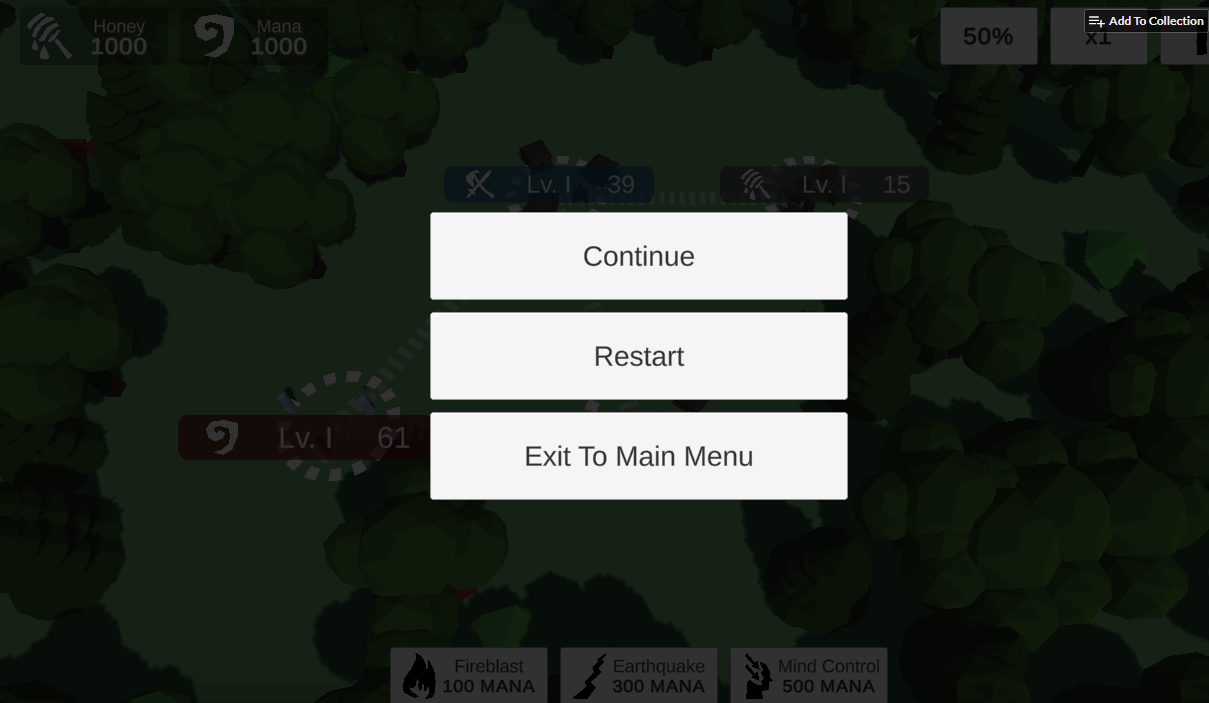
After the showcase, I had still about a month to complete this project. It’s a very short time so in my opinion, it’s better to move faster towards the end. The last thing I added were three buttons for menu toggle, time scale multiplier and changing part of army power to send.
    // ...
    public void OnMenuButton()
    {
        _gameplayController.IsShowingMenu = true;
    }

    public void OnTransportPartButton()
    {
        float currentPart = _gameplayController.TransportPart;

        switch (currentPart)
        {
            case 0.25f:
                _gameplayController.TransportPart = 0.5f;
                break;
            case 0.5f:
                _gameplayController.TransportPart = 0.75f;
                break;
            case 0.75f:
                _gameplayController.TransportPart = 1f;
                break;
            case 1f:
                _gameplayController.TransportPart = 0.25f;
                break;
        }
    }

    public void OnSpeedButton()
    {
        float currentSpeed = _gameplayController.GameplaySpeedMultiplier;

        switch (currentSpeed)
        {
            case 0.5f:
                _gameplayController.GameplaySpeedMultiplier = 1f;
                break;
            case 1.0f:
                _gameplayController.GameplaySpeedMultiplier = 1.5f;
                break;
            case 1.5f:
                _gameplayController.GameplaySpeedMultiplier = 2f;
                break;
            case 2f:
                _gameplayController.GameplaySpeedMultiplier = 2.5f;
                break;
            case 2.5f:
                _gameplayController.GameplaySpeedMultiplier = 3f;
                break;
            case 3f:
                _gameplayController.GameplaySpeedMultiplier = 3.5f;
                break;
            case 3.5f:
                _gameplayController.GameplaySpeedMultiplier = 4f;
                break;
            case 4f:
                _gameplayController.GameplaySpeedMultiplier = 0.5f;
                break;
        }

        Time.timeScale = _gameplayController.GameplaySpeedMultiplier;
    }
    // ...
And that’s it! I was now celebrating Christmas and charging power for the next challenges. But now it’s time to slow down for a little and spend more time with friends and family, at least we aren’t machines but humans and in my opinion we need some social life 🎄❤
I wish you a fantastic day! 😃
Days 15-21: Blender & 3D Modelling
It’s been one week since I finished my game development project, a game called “Vistulans”. And now I am back with articles about it. This article will cover the third week of development progress from the six weeks total. This week I spent on 3D modelling and learning the basics of Blender.
The third week came and the time to start modelling arrived. The choice of software for modelling was obvious for me. At university we use Blender so I picked it up for my game too. It’s free to use and very powerful. I hadn’t had much experience with it before. A few years ago I had created a simple monitor and some other simple models, but nothing more.
About 3D graphics, I learned there are Vertices, Faces and Triangles. A few objects at the scene can be grouped together with Collections. Objects can have Modifiers and Materials.
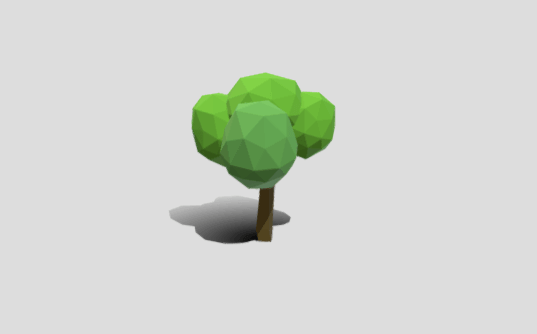
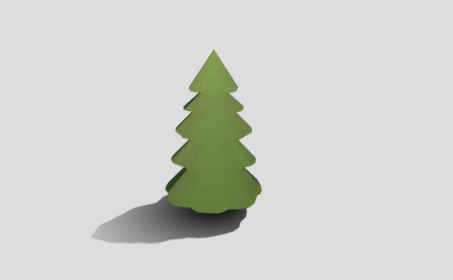
This time I had been working on the entire game assets. I wanted to create everything myself, so the list of elements was very long: trees, rocks, bushes, mushrooms, different buildings and elements of the environment. I started with reminding myself what I had learnt in lessons at university, then I watched some videos on YouTube from the YanSculpt channel.
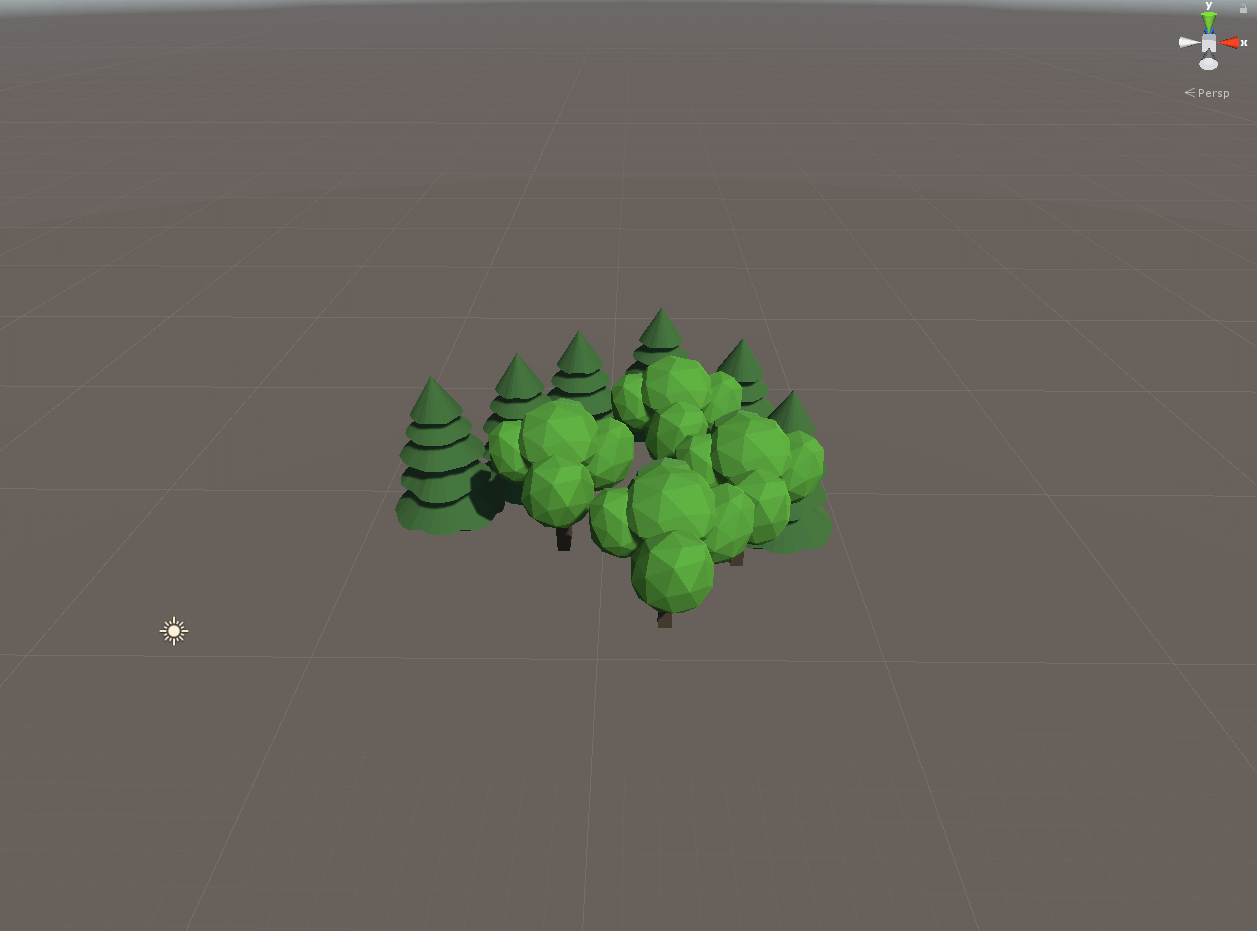
My first 3D models for the game were trees.
Next, I worked on the rest of the environment elements listed above.
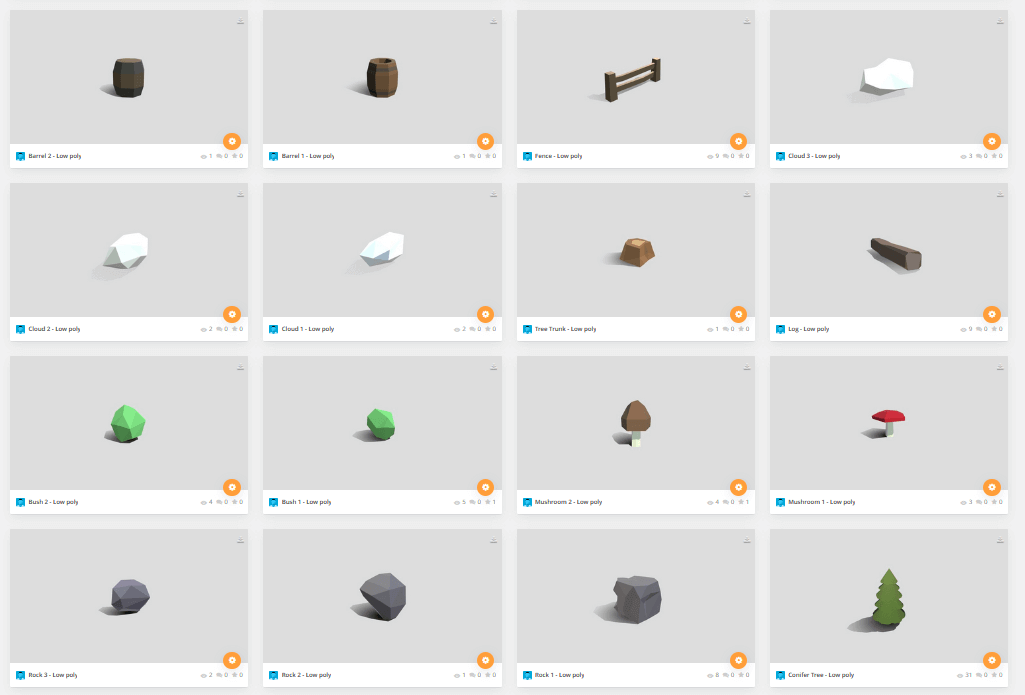
The hardest part was to model simple buildings for village, apiary and shrine. It was hard because the model must be very low poly and still look like a building 😅
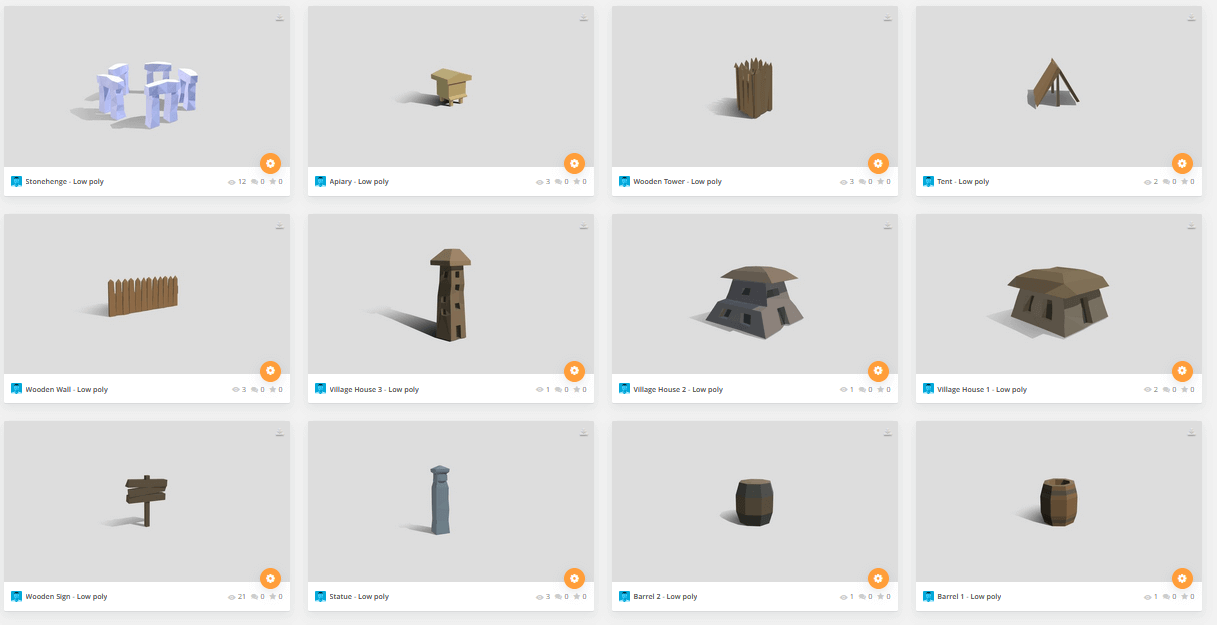
The Stonehenge (which isn’t Slavic but who cares, it looks pretty mysterious :D) I made with Array and Curve object modifiers. I don’t use any textures on my models. Each model has just a base colour that varies in different faces. Combining everything together made the game look simple, but pretty :D
Even better with a procedural map generator and new UI which I am going to explain in the next section.
Totally I had made over 30 models, and each one I uploaded to Sketchfab with creative commons licence & free download. If you are looking for models for your future game, maybe you will be interested: https://sketchfab.com/lightguard/collections/ancient-game
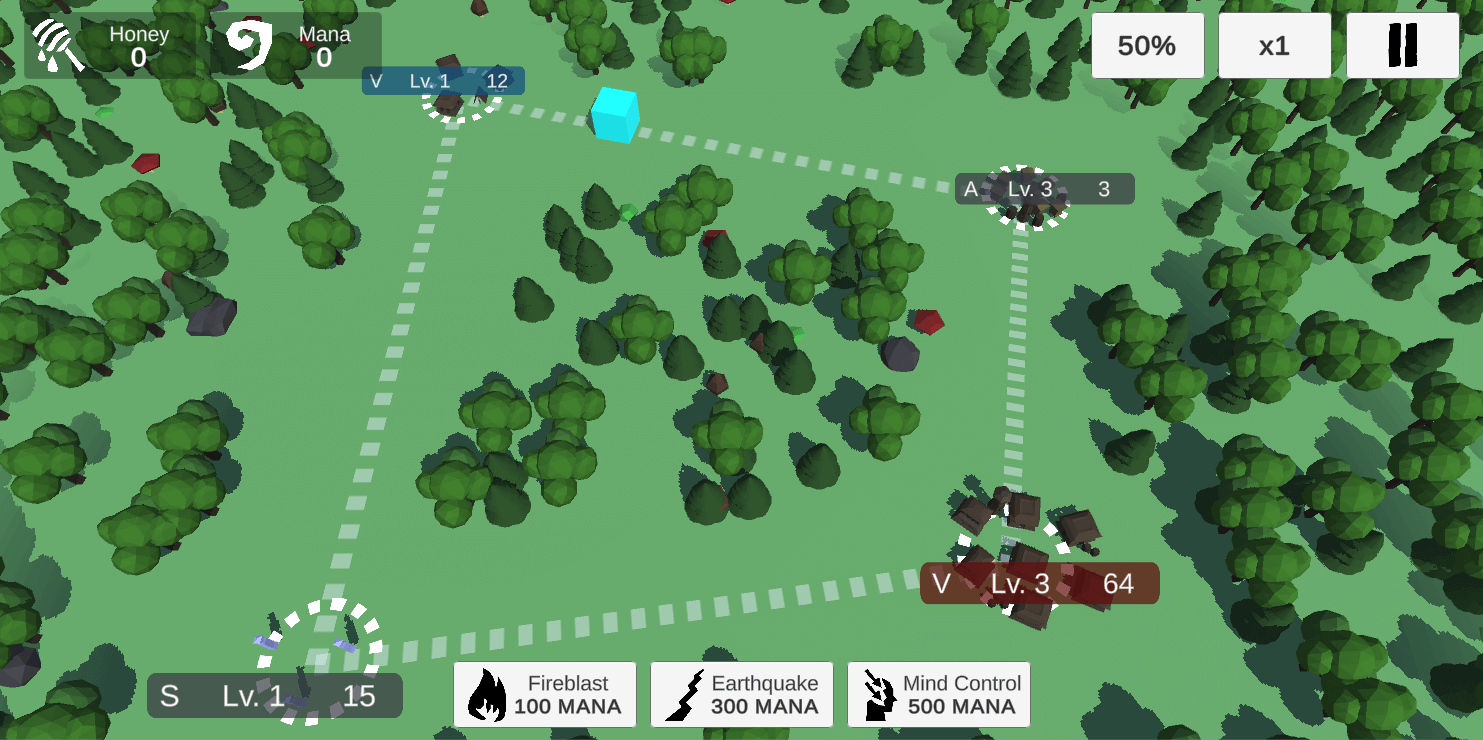
Days 16-28: Core Gameplay & Map Generation
After creating 3D models and replacing placeholders with the real meshes I moved to work on gameplay. Previously I had created simple capturing of vertices, navigating warriors between vertices and fighting between armies.
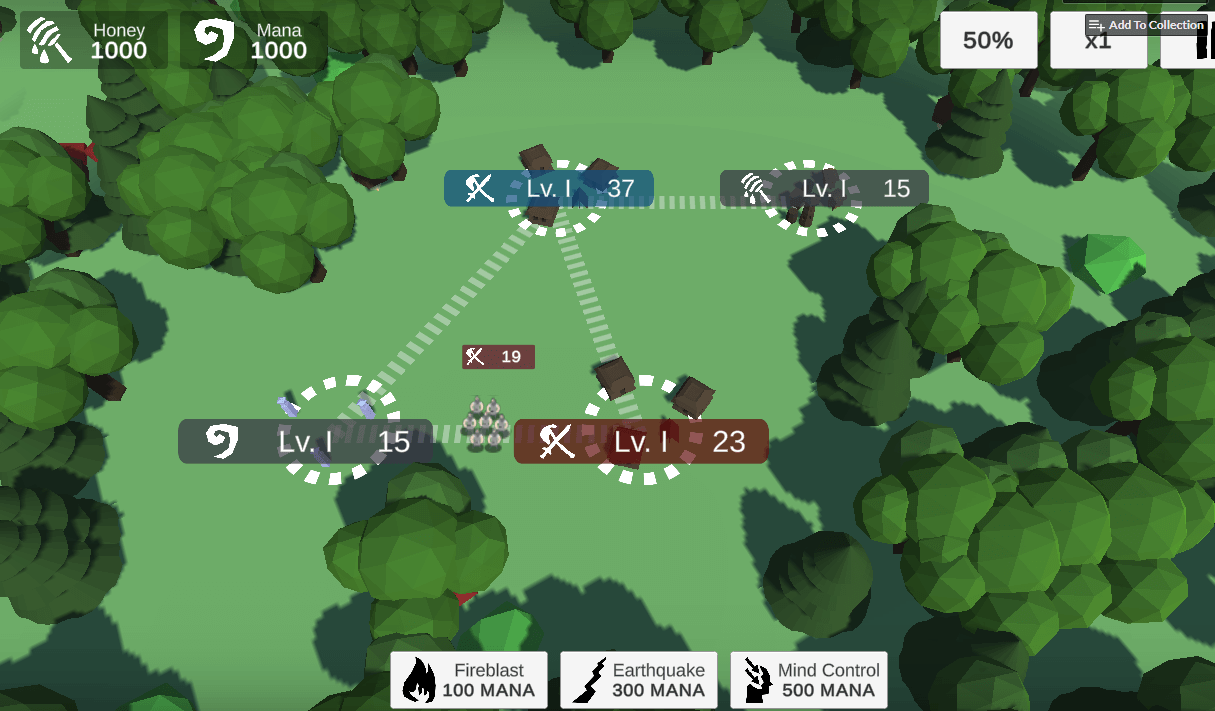
Different levels of vertices
This time I started working on replaceable meshes for different levels of vertices. I spawned circles to distinguish decorative and clickable game objects. Between vertices, I created lines to show the graph and connections. I also made sunshaft particles whose position is set to an active vertex.
Map generation
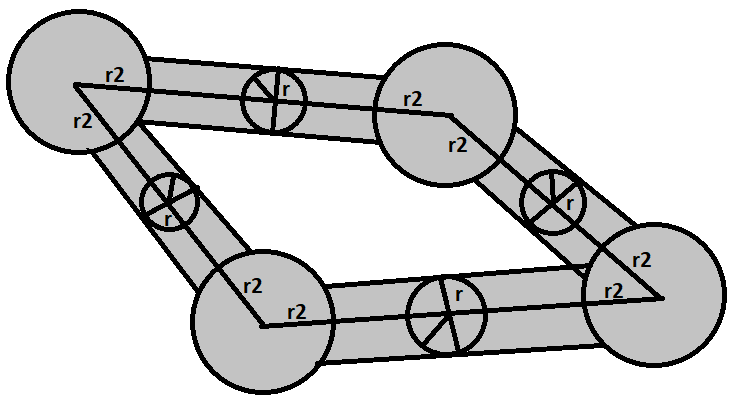
At this moment I got an “aha moment”! Randomly spawned trees looked ugly so I used a mathematical formula for calculating the distance between decoration transform position and nearest point on the line between vertices. Only if the distance is greater than r, the decoration is spawned.
/// <summary>
/// Calculate distance of point from a line
/// https://brilliant.org/wiki/dot-product-distance-between-point-and-a-line/
/// https://stackoverflow.com/questions/52105704/how-to-do-drag-and-drop-on-x-z-axis-in-unity3d
/// </summary>
/// <param name="point">Point</param>
/// <param name="start">Start of the line</param>
/// <param name="end">End of the line</param>
/// <returns></returns>
float GetDistanceFromEdge(Vector2 point, Vector2 start, Vector2 end)
{
	float A = point.x - start.x;
	float B = point.y - start.y;
	float C = end.x - start.x;
	float D = end.y - start.y;

	float dotProduct = A * C + B * D;
	float lengthSquare = C * C + D * D;

	float param = -1;

	if (lengthSquare != 0)
	{
		param = dotProduct / lengthSquare;
	}

	float xx, yy;

	if (param < 0)
	{
		xx = start.x;
		yy = start.y;
	}
	else if (param > 1)
	{
		xx = end.x;
		yy = end.y;
	}
	else
	{
		xx = start.x + param * C;
		yy = start.y + param * D;
	}

	float dx = point.x - xx;
	float dy = point.y - yy;

	return Mathf.Sqrt(dx * dx + dy * dy);
}
Similarly, I calculate the distance r2 between two points: the transform position of a vertex object and decoration. However this time I used the built-in function instead of writing my own.
/// <summary>
/// Calculate distance between selected position and position of vertex
/// </summary>
/// <param name="spawnPosition"></param>
/// <param name="vertex"></param>
/// <returns></returns>
float GetDistanceFromVertex(Vector3 spawnPosition, GameObject vertex)
{
	return Vector3.Distance(spawnPosition, vertex.transform.position);
}
And this is how I make sure decoration won’t overlap army and looks better than random noise.
2D Assets & UI
After creating world generation and 3D stuff I moved to 2D assets. I created vector icons for the UI. When working on UI, I created a pause menu, main menu with level selection and instructions on how to play.
Days 29-36: Enemy AI & Final Polish
At the end of the journey with the development of my game, I had been working on something that pretends to be enemy artificial intelligence. In this case, AI is a set of algorithms which allows making decisions against the player.
AI in Vistulans is separated into four different topics:
- Finite-State-Machine for managing different states of vertices
- Dijkstra-like greedy algorithm for offensive decisions
- Breadth-First-Search algorithm for defensive decisions
- Decision Tree for resources management and casting spells
Vertex States
Every vertex can be in one of a few states. It may be owned by the player, one of the enemy bots or by the wild tribe (inactive). When writing the game, I tried to make it possible to add unlimited enemies, fighting with each other, as long as the player has enough strong device to run it. Furthermore, each vertex can be at a different level, so the value of the vertex is different and is based on army number staying at the vertex, vertex owner, vertex type and vertex level. That information is used to run one of the pathfinding algorithms.
Attack Algorithm
For each enemy vertex it is checked if neighbours are owned by other owners and have less army power than the current vertex * 1.3. Thanks to this little overcalculation it seems the enemy is waiting to be not only strong enough to capture new vertex but also to defend the current one.
            // Check if current vertex isn't player or wild
            if (vertex.Owner != OwnerType.Player && vertex.Owner != OwnerType.Wild)
            {
                // Check if vertex has neighbour,
                // if not then switch to second state
                List<VertexController> enemyNeighbours = new List<VertexController>();

                foreach (GameObject connection in vertex.Connections)
                {
                    VertexController connectedVertex = connection.GetComponent<VertexController>();

                    if (vertex.Owner != connectedVertex.Owner)
                    {
                        // First state, use Dijkstra to
                        enemyNeighbours.Add(connectedVertex);
                    }
                }

                // Sort list of enemy vertices to find vertex with lowest army power (weight)
                List<VertexController> sortedEnemyNeighbours = enemyNeighbours.OrderBy(o => o.ArmyPower).ToList();

                if (enemyNeighbours.Count > 0)
                {
                    foreach (VertexController enemyVertex in sortedEnemyNeighbours)
                    {
                        // Check if vertex has sufficient amount of army power to move
                        if (vertex.ArmyPower > enemyVertex.ArmyPower * 1.3f)
                        {
                            vertex.SendArmy(enemyVertex.Id, (int)(enemyVertex.ArmyPower * 1.3f));
                        }
                    }
                }
If the vertex doesn’t have enemy neighbours and all connected vertices are owned by the same owner, then a different algorithm searches further on the graph for vertices which have enemy neighbours and where army power will be more useful. Thanks to this, some enemy vertices gather resources and others fight with the player. The Breadth-First-Search algorithm in this case is used to determine if army traversing between two vertices is possible and which vertex will be next to traverse.
Those unconnected with the enemy are gathering army power and sending to vertices connected with vertices owned by someone else. To make it look nice, the destination vertex is picked based on which one has less army power and more needs help from another vertex. This is how games like this are played.
    /// <summary>
    /// Get shortest path from start
    /// </summary>
    /// <typeparam name="T"></typeparam>
    /// <param name="graph"></param>
    /// <param name="start"></param>
    /// <returns></returns>
    static Func<T, IEnumerable<T>> ShortestPath<T>(Graph<T> graph, T start)
    {
        // Contains previous vertex neighbours
        Dictionary<T, T> previousVertex = new Dictionary<T, T>();

        Queue<T> queue = new Queue<T>();
        queue.Enqueue(start);

        // Perform until traverse all vertices (empty queue)
        // and in every step add neighbours of current vertex
        while (queue.Count > 0)
        {
            // Get first vertex in the queue to scan for neighbours
            var vertex = queue.Dequeue();

            // For each connected neighbour in adjacency list
            foreach (var neighbour in graph.AdjacencyList[vertex])
            {
                if (previousVertex.ContainsKey(neighbour))
                {
                    continue;
                }

                previousVertex[neighbour] = vertex;

                // Add every neighbour to que
                queue.Enqueue(neighbour);
            }
        }

        // Prepare path of jumps to selected vertex
        IEnumerable<T> ShortestPath(T end)
        {
            List<T> pathOfJumps = new List<T>();

            // Set current to current
            var currentVertex = end;

            // Traverse backward until reach start vertex
            while (!currentVertex.Equals(start))
            {
                // Add current vertex to jump list
                pathOfJumps.Add(currentVertex);
                currentVertex = previousVertex[currentVertex];
            }

            // Add jump at the end
            pathOfJumps.Add(start);

            // Reverse list to order from start to end
            pathOfJumps.Reverse();

            return pathOfJumps;
        }

        return ShortestPath;
    }
                // Second state, use Breadth-first search algorithm to determine where to move units
                if (enemyNeighbours.Count == 0)
                {
                    List<VertexController> verticesWithEnemyNeighbours = new List<VertexController>();

                    // Search for all vertices of current vertex
                    foreach (VertexController tempVertex in _gameplayController.VertexList)
                    {
                        if (tempVertex.Owner == vertex.Owner)
                        {
                            bool hasEnemyNeighbours = false;

                            foreach(GameObject connectedToEnemyVertex in tempVertex.Connections)
                            {
                                if (connectedToEnemyVertex.GetComponent<VertexController>().Owner != tempVertex.Owner)
                                {
                                    hasEnemyNeighbours = true;
                                }
                            }

                            if (hasEnemyNeighbours)
                            {
                                verticesWithEnemyNeighbours.Add(tempVertex);
                            }
                        }
                    }

                    // Function, which returns shortest path between this vertex and picked
                    Func<int, IEnumerable<int>> shortestPath = ShortestPath(_graph, vertex.Id);

                    int indexOfVertexToTraverse = -1;
                    int armyPowerOfVertexToTraverse = int.MaxValue;
                    int jumpDistanceToNearestMatchingVertex = int.MaxValue;

                    foreach(VertexController tempVertex in verticesWithEnemyNeighbours)
                    {
                        // Shortest path to tempVertex
                        List<int> pathJumps = shortestPath(tempVertex.Id).ToList();

                        if (pathJumps.Count < jumpDistanceToNearestMatchingVertex)
                        {
                            jumpDistanceToNearestMatchingVertex = pathJumps.Count;
                            indexOfVertexToTraverse = pathJumps[1];
                            armyPowerOfVertexToTraverse = tempVertex.ArmyPower;
                        }
                        else if (pathJumps.Count == jumpDistanceToNearestMatchingVertex && armyPowerOfVertexToTraverse > tempVertex.ArmyPower)
                        {
                            jumpDistanceToNearestMatchingVertex = pathJumps.Count;
                            indexOfVertexToTraverse = pathJumps[1];
                            armyPowerOfVertexToTraverse = tempVertex.ArmyPower;
                        }
                    }

                    // If found vertex to traverse, then send army
                    if (indexOfVertexToTraverse != -1)
                    {
                        // Print result
                        Debug.Log($"From {vertex.Id} to {indexOfVertexToTraverse}");

                        if (vertex.ArmyPower > 1)
                        {
                            vertex.SendArmy(indexOfVertexToTraverse, vertex.ArmyPower - 1);
                        }
                    }


/// <summary>
/// Represent graph vertices and connections
/// </summary>
/// <typeparam name="T"></typeparam>
public class Graph<T>
{
    /// <summary>
    /// Instantiate new graph
    /// </summary>
    /// <param name="vertices">Vertices</param>
    /// <param name="edges">Edges</param>
    public Graph(IEnumerable<T> vertices, IEnumerable<Tuple<T, T>> edges)
    {
        // Add every vertex to adjacency list
        foreach (var vertex in vertices)
        {
            AddVertex(vertex);
        }

        // Add every vertex to adjacency list
        foreach (var edge in edges)
        {
            AddEdge(edge);
        }
    }

    // Adjacency list, represents vertices and connections between them
    public Dictionary<T, HashSet<T>> AdjacencyList { get; } = new Dictionary<T, HashSet<T>>();

    /// <summary>
    /// Add vertex to adjacency list
    /// </summary>
    /// <param name="vertex"></param>
    private void AddVertex(T vertex)
    {
        AdjacencyList[vertex] = new HashSet<T>();
    }

    /// <summary>
    /// Add edge to adjacency list
    /// </summary>
    /// <param name="edge"></param>
    private void AddEdge(Tuple<T, T> edge)
    {
        if (AdjacencyList.ContainsKey(edge.Item1) && AdjacencyList.ContainsKey(edge.Item2))
        {
            AdjacencyList[edge.Item1].Add(edge.Item2);
            AdjacencyList[edge.Item2].Add(edge.Item1);
        }
    }
}
The last part was the possibility to upgrade vertices and cast spells. This is a very simple decision tree made of conditional statements and calculation of resources. If an enemy has a greater increase of mana it should wait and cast a more powerful spell than when it has a lower increase. Of course, it should have enough resources at the moment to cast a spell.
    /// <summary>
    /// Based on current increment of mana, cast spells
    /// </summary>
    void CastSpellsAI()
    {
        int[] totalManaIncrease = { 0, 0, 0, 0, 0 };

        // Count mana increase per owner
        foreach (VertexController vertex in _gameplayController.VertexList)
        {
            if (vertex.Type == VertexType.Shrine)
            {
                totalManaIncrease[(int)vertex.Owner] += vertex.Level;
            }
        }

        foreach (VertexController vertex in _gameplayController.VertexList)
        {
            // For each enemy player
            if (vertex.Owner != OwnerType.Player && vertex.Owner != OwnerType.Wild)
            {
                // Decide if cast spells
                if (_gameplayController.Mana[(int)vertex.Owner] >= 100 && totalManaIncrease[(int)vertex.Owner] <= 2)
                {
                    foreach (VertexController tempVertex in _gameplayController.VertexList)
                    {
                        if (tempVertex.Owner != vertex.Owner && tempVertex.Owner != OwnerType.Wild)
                        {
                            _gameplayController.Mana[(int)vertex.Owner] -= 100;
                            _gameplayController.CastOffensiveSpell(tempVertex);
                            break;
                        }
                    }
                }
                else if (_gameplayController.Mana[(int)vertex.Owner] >= 300 && totalManaIncrease[(int)vertex.Owner] >= 3 && totalManaIncrease[(int)vertex.Owner] <= 4)
                {
                    foreach (VertexController tempVertex in _gameplayController.VertexList)
                    {
                        if (tempVertex.Owner != vertex.Owner && tempVertex.Owner != OwnerType.Wild)
                        {
                            _gameplayController.Mana[(int)vertex.Owner] -= 300;
                            _gameplayController.CastEarthquakeSpell(tempVertex);
                            break;
                        }
                    }
                }
                else if (_gameplayController.Mana[(int)vertex.Owner] >= 500 && totalManaIncrease[(int)vertex.Owner] >= 4)
                {
                    // Search for vertex with highest army power to takeover
                    int vertexIdWithHighestArmy = -1;
                    int vertexArmyPower = int.MinValue;
                    foreach (VertexController tempVertex in _gameplayController.VertexList)
                    {
                        if (tempVertex.Owner != vertex.Owner && tempVertex.Owner != OwnerType.Wild)
                        {
                            if (vertexArmyPower < tempVertex.ArmyPower)
                            {
                                vertexIdWithHighestArmy = tempVertex.Id;
                            }
                        }
                    }

                    if (vertexIdWithHighestArmy != -1)
                    {
                        _gameplayController.Mana[(int)vertex.Owner] -= 500;
                        _gameplayController.CastTakeoverSpell(GameObject.Find($"vertex{vertexIdWithHighestArmy}").GetComponent<VertexController>(), vertex.Owner);
                        break;
                    }
                }
            }
        }
    }
Similarly, I made enemy upgrades. I am calculating the total increase of honey which is used as a resource for upgrading vertices.
    void UpgradeAI()
    {
        foreach (VertexController vertex in _gameplayController.VertexList)
        {
            // For each enemy player
            if (vertex.Owner != OwnerType.Player && vertex.Owner != OwnerType.Wild)
            {
                if (vertex.Type == VertexType.Apiary && _gameplayController.Honey[(int)vertex.Owner] >= vertex.Level * 25)
                {
                    _gameplayController.UpgradeVertex(vertex);
                }
            }
        }

        foreach (VertexController vertex in _gameplayController.VertexList)
        {
            // For each enemy player
            if (vertex.Owner != OwnerType.Player && vertex.Owner != OwnerType.Wild)
            {
                if (vertex.Type == VertexType.Village && _gameplayController.Honey[(int)vertex.Owner] >= vertex.Level * 25)
                {
                    _gameplayController.UpgradeVertex(vertex);
                }
            }
        }

        foreach (VertexController vertex in _gameplayController.VertexList)
        {
            // For each enemy player
            if (vertex.Owner != OwnerType.Player && vertex.Owner != OwnerType.Wild)
            {
                if (vertex.Type == VertexType.Shrine && _gameplayController.Honey[(int)vertex.Owner] >= vertex.Level * 25)
                {
                    _gameplayController.UpgradeVertex(vertex);
                }
            }
        }
    }
This approach results in enemy AI which is pretty challenging. This is the end of the Vistulans development diary. Thanks for being with me for so long 😘 The game is playable in browser: Play Vistulans
This post was originally published on Dev.to